Recommendation points
- Self-calculation of parts
- Calculation for a standard size wardrobe
- Calculation of parts for a non-standard cabinet
- The nuances of cutting parts in a chipboard sheet
- We take into account the structure of the slab
- Cutting program
This article discusses the algorithm for self-calculation of wardrobe parts and the nuances of cutting in a chipboard sheet with a subsequent order in the furniture industry. The material, presented in a simple and accessible form, will help to avoid many mistakes made by beginners..
Self-calculation of parts
Calculation for a standard size wardrobe
So, you already have a wardrobe project. The only thing left to do is to calculate the detail. Before proceeding with the calculation of the dimensions of the parts, it is necessary to decide from which chipboard the cabinet will be made. There are two standard sizes of chipboard thickness – 18 and 16 mm. Most furniture firms use 16 mm chipboard in their production. We will also take a sixteen-millimeter slab as a basis. This value will appear in absolutely all calculations..
Let’s get started. Initially, to make it easier, write on a piece of paper the name and quantity of all the parts present in the wardrobe in a column. For example:
- roof – 1 piece.
- bottom – 1 piece.
- outer side – 2 pcs., and so on
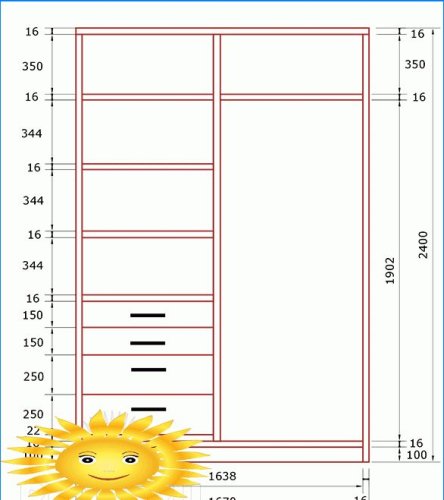
Let us consider the correct algorithm using an example of calculation for a cabinet with overall dimensions of 1670x2400x650 mm.
In order not to get confused, add the thickness of chipboard to your drawn wardrobe project, that is, make the lines double. This way you won’t miss a single thickness.
Roof – 1 pc. – 650×1670 mm
It is technically correct if the roof of the wardrobe rests on top of the sides, and is not between them. This means that its size does not change. It matches the dimensions of the cabinet – 650×1670 mm.
Bottom – 1 pc. – 650×1638 mm
The bottom of the cabinet is attached between two sides, therefore, it is necessary to subtract two chipboard thicknesses: 1670 – (16 + 16) = 1638 mm.
Outer side – 2 pcs. – 650×2384 mm
The outer sides are covered with a cabinet roof. Calculation formula: 2400 – 16 = 2384 mm.
Inner side – 1 pc. – 550×2268 mm
Master’s advice:the system of sliding doors, depending on the manufacturer, has a depth of 80–100 mm. For full opening, it is necessary to reduce all internal parts by this size. That is, the sides and shelves inside the wardrobe must be 80-100 mm less than the overall depth.
Calculation of the inner side of the cabinet:
- depth 650 – 100 = 550 mm;
- height 2400 – 16 (roof) – 16 (bottom) – 100 (base) = 2268 mm.
Plinth – 1 pc. – 100×1638 mm
Base / plinth – the lower bar that connects the two outer sides of the wardrobe and supports the bottom. The length of this strip is equal to the length of the bottom of the cabinet, the height is 100 mm (another size is possible, but not less than 50 mm).
Shelf – 1 pc. – 550×861 mm, 4 things. – 550×761 mm
Let us remind you that the inner side of the cabinet is shifted to the left by 50 mm for the purpose of comfortable operation of the drawers. It follows that the shelves on the right side of the cabinet should be longer than those on the left. To make it easier, first we calculate the size of the shelves as if they were the same, and only then we subtract 50 mm: 1670 – 32 (outer sides) – 16 (inner side) / 2 = 811 mm.
- 811 – 50 = 761 mm – the length of the shelves on the left side, where the drawers are;
- 811 + 50 = 861 mm – the length of the shelves on the right side of the wardrobe.
After calculations, be sure to check. The sum of all parts must equal the overall width of the cabinet: 761 + 861 + 16 + 16 + 16 = 1670 mm.
Drawer front – 2 pcs. – 150×757 mm and 2 pcs. – 250×757 mm
The height of the drawer is arbitrary. But the width is a technical value that must be calculated based on the internal size of the opening in which the boxes are located. In our case, it is 761 mm. For durable and efficient operation of the drawer from the internal size (if it is simpler – the length of the shelf), you need to subtract 4 mm for the technological gap. That is, the width of the facade: 761 – 4 = 757 mm.
Master’s advice:when calculating the width of the facade, do not forget about the edge, which will subsequently be glued around the perimeter. It also has its own thickness. Therefore, do not forget to subtract the thickness of the selected edge from the actual size of the drawer front..
Calculation of parts for a non-standard cabinet
A non-standard wardrobe is a product whose overall dimensions exceed the dimensions of a laminated chipboard sheet. The main dimensions of the chipboard: 1830×2750; 1830×2440; 2070×2800 mm.
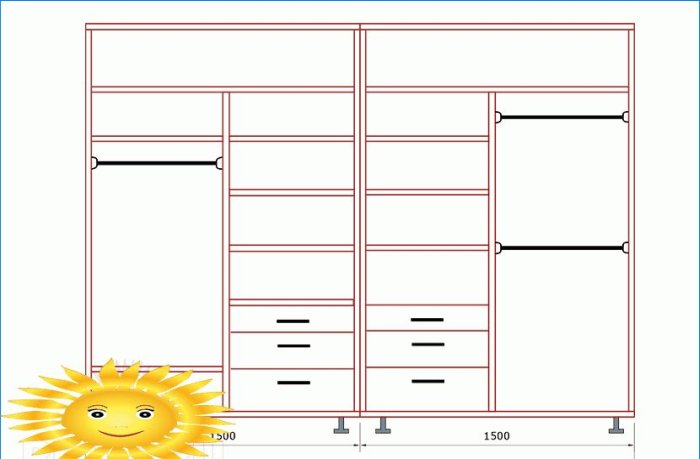
Going to independently make a wardrobe with a length of 3000 m, a beginner is faced with the problem that the roof and bottom do not fit into the dimensions of the chipboard. How to get out of this situation? It’s simple – we are designing a wardrobe in two parts, that is, now there will be two sides inside, and not one. The roof, bottom and plinth will also be in two parts. In fact, these are two separate cabinets, tied together.
Important: the depth of the inner sides is 80–100 mm less than the dimensions of the wardrobe.
In addition to the above, it will be correct to install such a large wardrobe not just on the base, but on plastic adjustable legs, which are subsequently closed with a removable bottom bar.
We recommend that you carefully study the diagram in order to avoid errors in the calculation of the cabinet detailing. The proposed drawing clearly shows how the parts are located, taking into account the design of the non-standard cabinet and the thickness of the chipboard.
The nuances of cutting parts in a chipboard sheet
Having written all the details on a piece of paper, you have two options. The first one is to go with this list straight to the company, where the specialists will do the cutting and transfer it to the furniture shop for cutting. The disadvantage of this option is that you will not be able to control how correctly the cutting of parts in the chipboard sheet is made, which means that there is a possibility of overpayment.
The second option is more complicated, but much more profitable for you – to decompose the parts yourself and pre-calculate the required number of chipboard sheets.
We take into account the structure of the slab
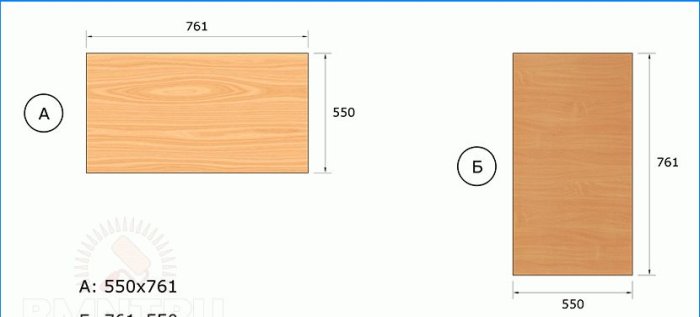
If you plan to make a sliding wardrobe from chipboard with a wood structure applied, you need to rewrite all the details in a certain pattern. For example, by specifying the first dimension against the structure.
If the chipboard is smooth, monochromatic – the dimensions of the parts can be written in any sequence.
Cutting program
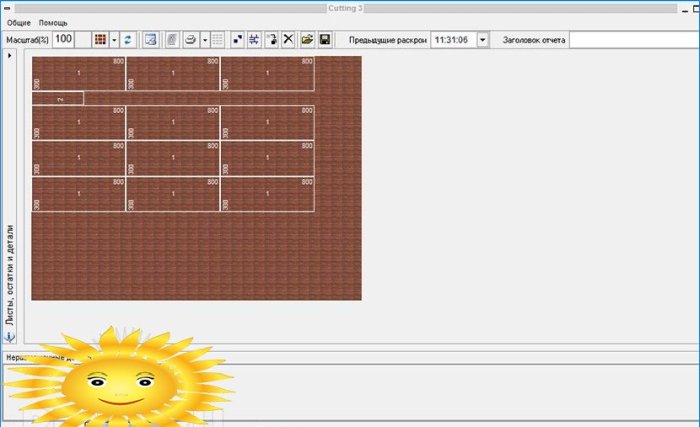
The most common chipboard cutting program is Cutting. It can be easily found in the public domain on the Internet, it is free and installed on a computer in two clicks. The program makes it possible not only to automatically lay out the parts in the sheet, but also allows manual adjustments.
The principle of operation of Cutting is that you enter the dimensions of the plate and the details of the wardrobe, and it calculates the optimal layout option. If you are not satisfied with the cutting results, then you can easily move and turn the parts yourself..
Master Tips:
- The overall size of the chipboard sheet must be entered 20 mm less. That is, if the plate is 1830×2750 mm, specify 1810×2730 mm in the program. 20 mm – technological positioning (swollen or chipped edges are cut off on the machine).
- In the column “kerf width” enter – 4 mm – this is the width of the cutting saw.
- Do not forget about the structure of the chipboard sheet.
Having made your own cutting of parts in a chipboard sheet, it will become clear how many boards you will have to purchase. Often, the production department does not sell parts separately, but only takes into account the number of plates. If it turns out that most of one of the sheets is not involved, you still have to pay for it. Therefore, in a relaxed home environment, think and design, for example, a small coffee table or additional hanging shelves to match the new cabinet. Thus, you make the most of the purchased material and harmoniously equip the interior of the room..
Master’s advice:picking up finished parts from the shop, be sure to check the correct size. Don’t be lazy, count and measure every detail.
Summing up the article, there is only one thing to add. If you strictly followed the above instructions, were attentive and did not pass by the advice of experienced craftsmen, you can safely go with the cutting card to the sawing shop, and having received the finished parts, assemble the wardrobe yourself.


Can you please provide step-by-step instructions or a guide for designing and calculating a sliding wardrobe? I would like to attempt a do-it-yourself project, but I need some guidance on how to measure the space, choose materials, and ensure the functionality of the sliding mechanism. Any tips or suggestions would be greatly appreciated!
Sure! Here’s a step-by-step guide for designing and calculating a sliding wardrobe:
1. Measure the space: Start by measuring the width, height, and depth of the area where you want to install the sliding wardrobe. Take accurate measurements to ensure a proper fit.
2. Choose materials: Consider the style and durability you desire. Common options for wardrobe materials include wood, MDF, and laminate. Make sure to select materials that are suitable for sliding mechanisms.
3. Determine the layout: Decide on the number of compartments, shelves, and hanging rails based on your storage needs. Sketch out a rough design to visualize the arrangement of the wardrobe.
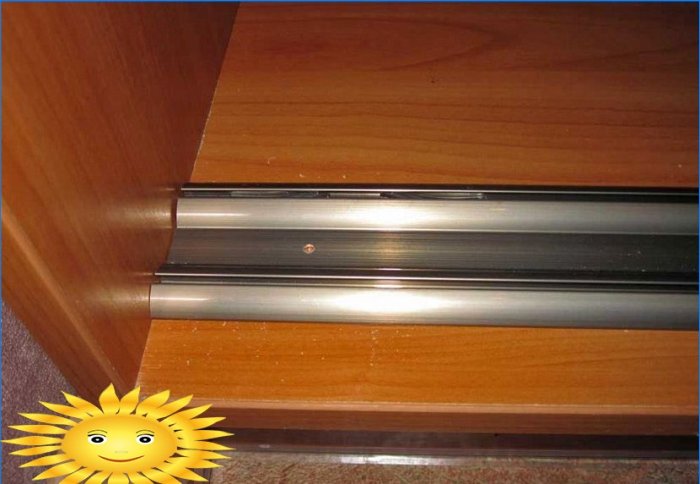
4. Design the sliding mechanism: Choose between top-hung or bottom-rolling sliding door systems. Consider factors such as weight capacity, door size, and ease of installation. Check for suitable products available in the market.
5. Calculate dimensions: Calculate the dimensions of individual panels and doors based on your measurements. Consider the thickness of the materials and sliding tracks while calculating door sizes.
6. Purchase materials: Once you have all the measurements and know the materials required, purchase them from a reliable supplier. Don’t forget to get the necessary hardware for the sliding doors.
7. Construct the wardrobe: Cut the panels to the required dimensions and assemble the wardrobe according to your design. Ensure stability and durability by using appropriate joining methods.
8. Install sliding mechanism: Follow the manufacturer’s instructions to install the chosen sliding mechanism. Ensure smooth movement and adjust the door alignment if necessary.
9. Finish and accessorize: Sand and finish the wardrobe using suitable paints, stains, or laminates. Install any additional accessories like handles, hooks, or mirrors to enhance functionality.
10. Test and make adjustments: Test the sliding doors to ensure they glide smoothly. Make any necessary adjustments to door alignment or hardware for optimal functionality.
Remember to take safety precautions and consult professionals if needed. Good luck with your DIY project!