Recommendation points
- Correct measurements of the room
- Calculation of the overall dimensions of the wardrobe
- Using the inside of the cabinet
- Project creation
The article is a practical guide to self-calculation of a wardrobe at home. Contains detailed information on measurements, design and cutting. Thanks to the advice of experienced craftsmen, it will help to avoid common mistakes made by beginners.
Correct measurements of the room
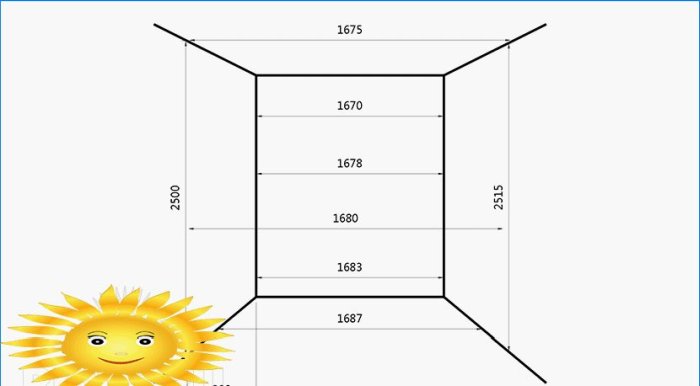
Correct measurements are the first step to the successful assembly and installation of the wardrobe. Unfortunately, even walls and floors are rare. Furniture, on the other hand, is a construction with right angles. Therefore, when measuring the space reserved for the wardrobe, one should take into account the curvature of the walls and make the necessary technological gaps. To understand what size the future product will be, using a construction tape measure the height and width in several places: top-bottom-middle along the wall, height at three or four points, and width relative to the floor and ceiling at the estimated depth of the cabinet.
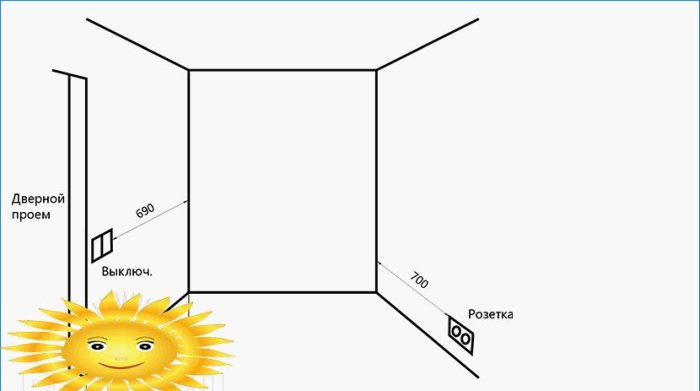
Now you should pay attention to ledges, sockets, batteries, door openings and other objects that are nearby. Nothing should interfere with the installation, and in the future, the cabinet should not overlap any of the above. Therefore, in order not to forget about their existence, it is best to draw strategically important objects and measure the distance to them..
Calculation of the overall dimensions of the wardrobe
Width
The width of the wardrobe is calculated by determining the smallest size obtained. In our example, this is 1670 mm. In order for the cabinet to fit smoothly into the niche, it is necessary to subtract 50 mm from the actual (minimum) width of the room. Thus, we get a technological gap that allows you not to worry during the subsequent installation..
Depth
The depth of the wardrobe also depends on previous measurements. In our picture, the minimum dimension that can be used is the distance to the switch, that is, 690 mm. Subtracting 30–40 mm from it, we get the depth of the cabinet. It should be noted that 650–700 mm is the optimal depth of the wardrobe, which allows efficient use of its internal space. A sliding door system typically occupies 80-100 mm, which means the remaining usable area is only 550-600 mm.
Height
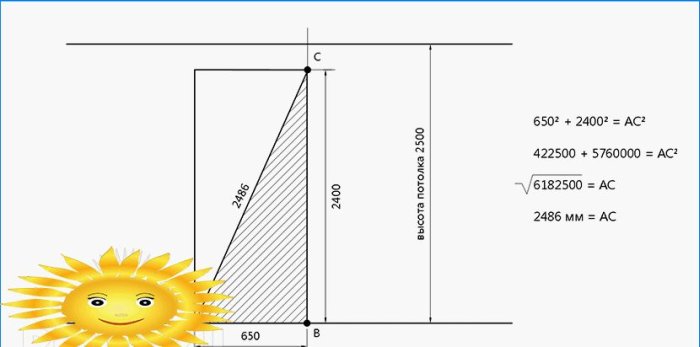
When calculating the height of the cabinet, you will have to recall the school curriculum in mathematics, namely, the Pythagorean theorem. What for? The wardrobe is a rather bulky design, which is easiest to assemble on the floor. When lifting it, it is necessary to take into account the diagonal of the side wall so as not to rest against the ceiling.
Pythagorean theorem: “In a right-angled triangle, the square of the hypotenuse is equal to the sum of the squares of the legs”.
The figure shows the side of the cabinet, the diagonal of which (AC) is the longest segment that affects the lifting of the sliding door from the horizontal position. Under the image, the application of the theorem is clearly shown, during which we found out that with the overall dimensions of the side wall of 650×2400 mm, the sliding wardrobe can be installed without a threat to the ceiling, since the side diagonal is much less than the height of the room.
Using the inside of the cabinet
Before you start creating a wardrobe project, you need to decide for what purposes it is intended. Simply put, what things do you plan to store in it. And here again you need to arm yourself with a tape measure, and carefully examine the cabinet that you are currently using:
- The optimum distance between shelves is 300 mm. But it is better to approach this issue individually: measure stacks of folded things, measure boxes of shoes, analyze what does not suit you in an old closet.
- The required depth of the cabinet for the hangers, on which hanging items are located, is 550–600 mm. If the actual depth of the future wardrobe varies within these limits, then a bar can undoubtedly be used. If the depth is much less, then it is best to install pull-out hangers and then things will be located “facing” you.
- Decide what you will store in the drawers, what height they should be and how many drawers you need.
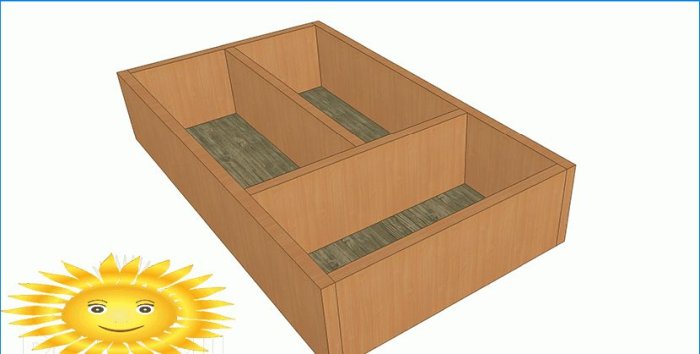
- Expert advice: it is advisable to divide wide drawers into several cells, thereby making an organizer that optimizes the storage of oversized items.
- Explore the market for the offered fittings for wardrobes: pull-out nets, tie hangers, built-in ironing board, pantograph, shoe racks and more. Correctly selected fittings will greatly facilitate filling the interior space.
Project creation
There are many computer programs available to help you create your project. But if graphic editors are higher mathematics for you, it remains to arm yourself with a simple pencil, eraser, ruler and a piece of paper in a cage. We will draw the wardrobe by hand.
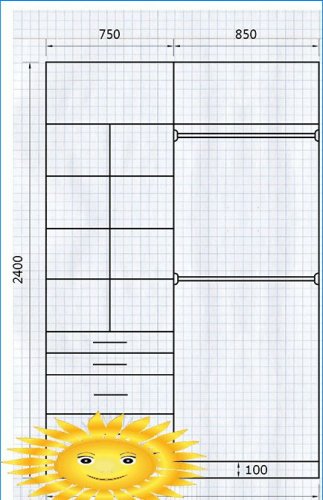
On a piece of paper in a cage, it is easiest to draw an image to scale – let the two cells be 10 cm.That is, the height of our wardrobe is 24 cm (48 cells), and the width is 16 cm (32 cells). We draw a rectangle based on the overall dimensions and not forgetting about the selected scale.
Next, you need to decide on the design of the cabinet itself – whether it will be on adjustable legs or the sides are planned to be placed directly on the floor. In our example, we will consider the option of a sliding wardrobe with a plinth, that is, the sides are on the floor.
Plinth – the bottom bar connecting the two sides of the cabinet. Its recommended height is 100 mm.
We separate these 100 mm (2 cells), we get an inner opening. Before you are going to divide it in half with a vertical line, carefully read the wizard’s advice below..
The drawers will interfere with the sliding wardrobe doors if it is divided into equal halves. The middle side of the cabinet must be moved to one side by 50–70 mm, and drawers must be installed in the smaller part. You should also pay attention to the fact that the door rail has a certain height. It is enough to raise the front of the lower drawer by only 10 mm, and it will be able to move out without hindrance..
So, the wardrobe is divided into unequal parts and the lower drawer is drawn with the required gap. Now it’s time to show your imagination and try to use the resulting space in the most functional way. Here is a sketch of our designer-constructor:
Based on it, you can easily independently sketch the initial draft of the wardrobe on a sheet of paper.
In the second part of the article “Do-it-yourself design and calculation of a sliding wardrobe” we will consider:
- Calculation of the details of the wardrobe.
- The nuances of cutting parts in a chipboard sheet.
And believe me, a do-it-yourself wardrobe is real!


I am curious to know if there are any specific tools or software that can assist in the do-it-yourself design and calculation of a sliding wardrobe. Additionally, are there any essential measurements or considerations that should be kept in mind while designing? Any tips or advice would be greatly appreciated.
Yes, there are several tools and software available to assist in the do-it-yourself design and calculation of a sliding wardrobe. Some of these include online design tools, 3D modeling software, and even smartphone apps specifically designed for this purpose. These tools allow you to create a virtual representation of your wardrobe and make accurate measurements and calculations.
When designing a sliding wardrobe, it is essential to consider a few measurements and considerations. Firstly, measure the space where the wardrobe will be installed, including height, width, and depth. Take into account any obstructions such as windows, doors, or electrical outlets. Decide on the number of doors and their sizes depending on the available space and your storage needs.
Consider the interior layout, including the number of shelves, drawers, hanging rods, and accessory compartments required for your specific wardrobe contents. Think about the material, color, and style of the wardrobe that will complement your room’s decor.
Finally, ensure that the sliding mechanism is sturdy and smooth, allowing easy opening and closing of doors. It’s also recommended to double-check your design and measurements before ordering any materials or starting construction. Taking these measurements and considerations into account will help ensure a successful DIY sliding wardrobe project.