Recommendation points
- Basement siding with imitation of stone or brickwork
- Facing with artificial or natural stone
- Flat slate
- Cement particle board
- Moisture resistant plywood
- Facing the plinth with a stone
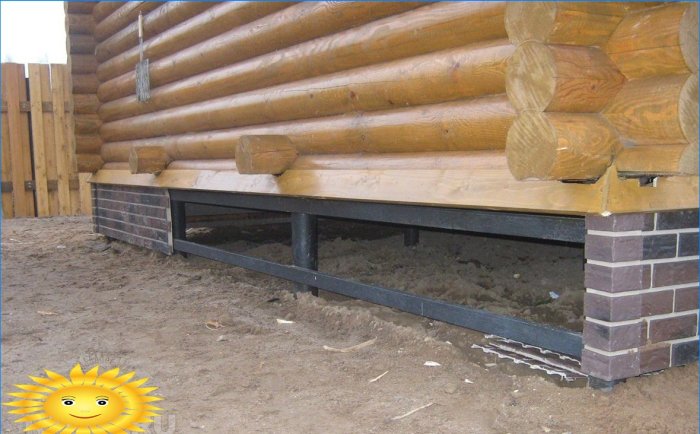
Stilt houses are a fairly popular type of house. The low cost of the pile foundation, the possibility of building houses on problem soils are arguments for the use of piles. But houses on stilts have a minus – this is the lack of a basement. But making a basement in such a house is quite simple.
The exterior decoration of a house is both a simple and complex issue. As a rule, the material from which the walls are made determines the material of the finish. But there is a type of houses, with the decoration of which certain difficulties arise – houses on stilts. Such houses, as a rule, do not have a basement, in any case, piles do not initially imply it. As a result, the house seems to be hanging in the air – this gives it some incompleteness. Houses of this type include houses with the most popular type of foundation – a columnar foundation. To give them a finished look and monumentality, it is necessary to make a basement. In any case, whether it is a decorative basement or a full-fledged basement floor, decorative stone will be the best material for decoration..
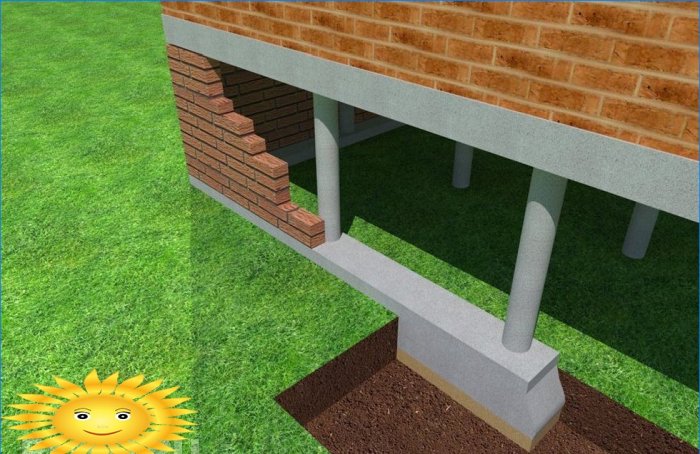
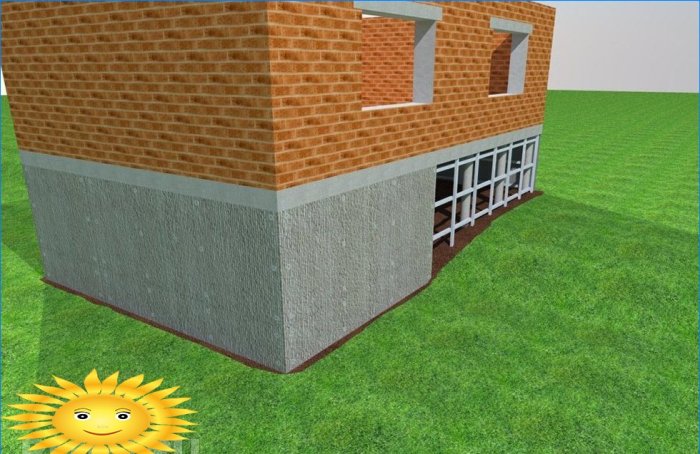
The most obvious option for arranging a basement will be to make a shallow strip foundation, followed by the construction of a basement wall on it. It can be made of brick or other masonry material. To equip the basement for decorative purposes, it is enough to make the masonry in half a brick, however, at a height of more than 1 m, it is advisable to reinforce the masonry with a metal strip across the row. If a full-fledged basement is being made, then it makes sense to lay at least one and a half bricks. In any case, the option with a foundation and masonry is the most time consuming and expensive..
What if the basement is not needed, there is no foundation and you want to save money? The answer is simple – make a decorative base. To make a base, lined with stone or “under the stone”, you can go in 2 ways:
- Close the space under the house with siding for masonry or brickwork.
- Make a flat retaining wall and stick natural or artificial stone on it.
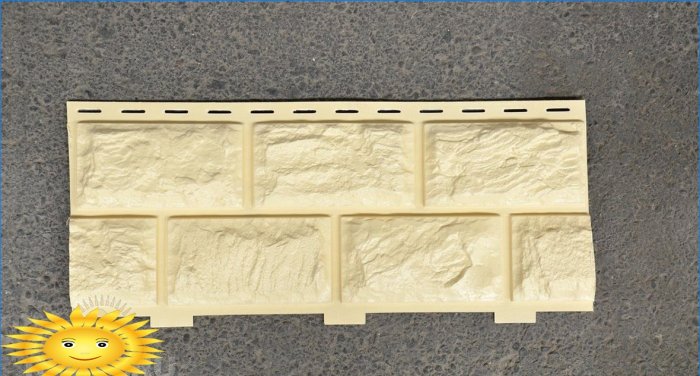
Basement siding with imitation of stone or brickwork
It is a vinyl panel that imitates masonry.
Pros:
- Easy installation.
- Durability – service life of about 30 years.
- Easy cleanability.
- Low cost – the cheapest option for a “stone” base.
Minuses:
- Low strength – is a thin-walled plastic panel with low impact resistance.
- Low energy saving – thin vinyl surface does not retain heat under the house.
- Low fire resistance – although vinyl is reluctant, it burns.
The basement siding is mounted on the lathing of an aluminum profile or wood.
When using an aluminum profile, it is necessary to adhere to the following sequence of works in the manufacture of the battens:
- From the bottom of the pile, standing at the highest point of the site, mark a horizontal line – this will be the first guide. We fix it to the piles. From it, with a step of 1/2 of the panel height, we mount other horizontal guides up and down for whole spans between the piles, pieces with the same step.
- We mount vertical guides in steps of 1/2 of the panel width. We start from the left corner of the house. We mount the final vertical on the right corner of the house. The lower part of the guides is buried 500 mm into the ground, the upper part is attached to the house. All horizontal and vertical guides must end up in the same front plane..
For the installation of a lathing made of a wooden bar, it is necessary to use a bar with a section of 50×50 mm, treated with an antiseptic impregnation, and the lathing should not reach the ground by 150 mm. The wooden lathing is installed in the same way as the aluminum profile lathing, only the main horizontal rail rises 150 mm above the ground.
After installing the battens, we begin to attach the siding panels. The installation sequence depends on the type of siding:
- Snap-lock siding, reminiscent of the locks of conventional vinyl wall siding. Such siding in the lower part has a hook bent to the wall, and in the upper part of the lock. Mounts from bottom to top and left to right. We fasten the first panel through the provided holes for fastening. For this, it is convenient to use galvanized self-tapping screws with a press washer. Since siding tends to change its linear dimensions from temperature changes, the screws should not be screwed in to the end. The panel should move freely within the mounting hole. After the first panel has been installed, the second panel is brought to its counterpart upper part of the lock from below and its hook is brought into engagement with an upward movement. The second and subsequent rows are made in the same way. If necessary, panels of the last row are cut to width.
- Siding without locking hooks – there are pins in the lower part of the panel, and sockets in the upper part. Installation is carried out from top to bottom. After mounting the first panel, the pins of the top panel are inserted into the slots of the next. The rest of the installation is carried out in the same way as the installation of siding with a lock.
If the site has a slope, the underside of the panels must be trimmed so that the edge follows the curves of the landscape. It doesn’t make sense to use a starter bar, because after installing the siding, earth is poured around the house to close the gap between the bottom of the panels and the soil. It also makes no sense to make a blind area. The grassy lawn will reliably hold the ground against erosion, and the house on stilts will not be flooded. The corners of the house are closed with special corner panels.
Thus, if you do not make high claims about the strength of the structure and the naturalness of its appearance, then vinyl siding will be an excellent option for arranging the basement of the house under a finishing stone.
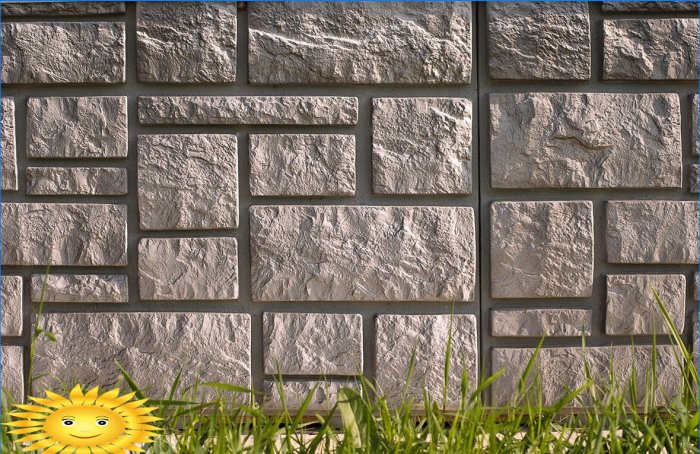
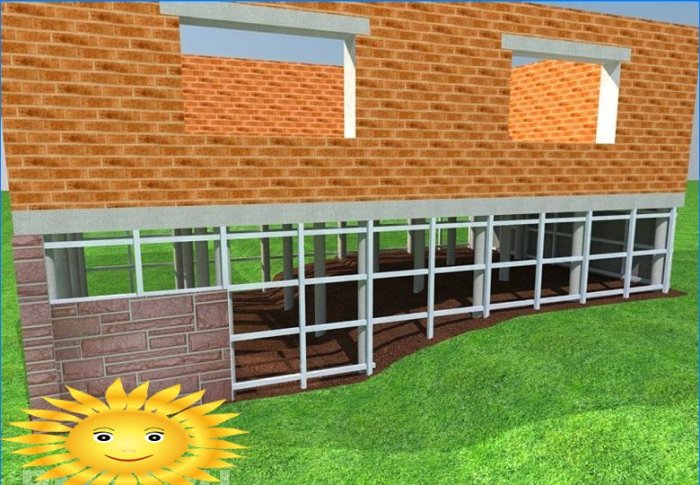
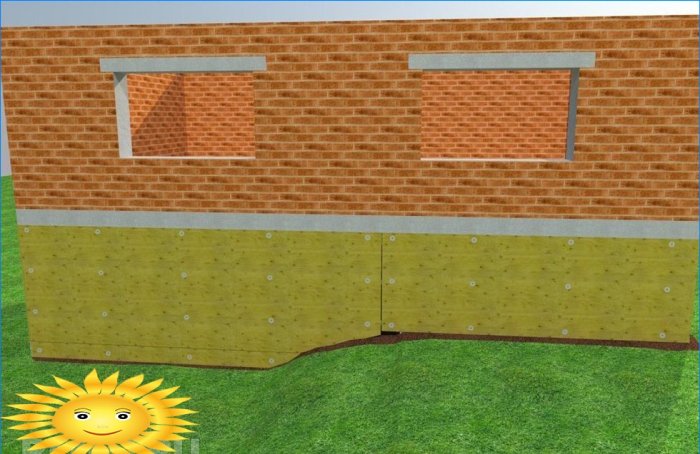
Facing with artificial or natural stone
For facing with a stone, it is necessary to have a solid, flat, flat surface on which the stone tiles will be glued.
To erect a basement wall, it is necessary to make a lathing frame and sheathe it with moisture-resistant flat sheets. What can be used for cladding:
- flat slate
- cement bonded particle board
- moisture resistant plywood
When choosing a material, you should pay attention to the following characteristics:
- Sizes – by choosing sheets of the optimal size, you can significantly save money, since different sheets cost differently, as a rule, the larger the sheet, the lower the price per sq. meter.
- Weight is an important characteristic when working alone and calculating power loads on the frame.
- Strength – The resulting surface must be very flexural strength. Otherwise, the glued stone tile may fall off from vibration and surface deformation..
- Durability or resistance to temperature extremes.
- Moisture resistance – the bottom edge of the surface will actually stand on the ground or in contact with it, therefore this is a very important characteristic. In addition, a house on stilts is often built in flooded areas, which means that the basement will be in the water for some time..
- Price.
Consider each of the listed materials in relation to these characteristics.
Flat slate
Flat asbestos-cement slabs. They are made of a cement mixture, reinforced with asbestos fibers. Flat slate can be pressed and unpressed. Possesses high fire resistance. Quite fragile when deformed, especially over time.
Main characteristics:
- Dimensions – length 3600, 3000, 2600 mm, width 1500 mm, thickness 6, 8, 10 mm.
- Weight – 18 kg / m2 with a thickness of 10 mm.
- Strength – 23 MPa for extruded and 18 MPa for non-extruded with a thickness of 10 mm.
- Resistance to temperature extremes – 50 freeze-thaw cycles for pressed and 25 for non-pressed.
- High moisture resistance.
- Price – 6 USD eat2 per pressed, 4.5 cu eat2 for unpressed at a thickness of 10 mm.
Installation of slabs made of flat slate is carried out on a crate made of a reinforced aluminum profile or a wooden bar with a section of 75×50 mm. The lathing is done in the same way as for basement siding, only the step of the guides should be no more than 500 mm. The joints of the panels must necessarily fall on the guides. To avoid weak points at the joints of the panels, it is better to mount in two layers with 10 mm sheets. The second layer is made with a shift relative to the first so that the seams of the first and second layers do not coincide. Fastened with a pitch of 100-150 mm with self-tapping screws to the guides along the entire plane.
Cement particle board
It is made from a cement mixture, reinforced with sawdust. A more plastic material than flat slate, it can withstand high impact and deformation loads. Characteristics hardly change over time.
Main characteristics:
- Dimensions – 3600×1200, 3200×1250 mm, thickness: 8, 10, 12, 16, 20, 24 mm.
- Weight – 16 kg / m2 with a thickness of 10 mm.
- Strength – 12 mPa at a thickness of 10 mm.
- Durability – 50 years.
- Average moisture resistance.
- Price – 4 USD eat2 with a thickness of 10 mm.
Installation is carried out in the same way as when using flat slate.
Moisture resistant plywood
Ordinary plywood with increased moisture resistance. The most plastic material. There are three types:
- Moisture resistant plywood FC – has an average water resistance. For indoor use only. Not suitable for our case.
- Plywood with increased moisture resistance FSF – adhesives based on phenol-formaldehyde resins are used in production.
- Bekelized moisture-resistant plywood FBS is the most durable and water-resistant material. Suitable for use in flooded areas.
The main characteristics of the FSF:
- Dimensions – length: 1500, 4400, 4900, 5600, 5700, 7700 mm; width: 1250, 1500, 1550 mm, thickness: 4, 6, 10, 12, 15, 18, 21 mm.
- Weight – 10 kg / m2 with a thickness of 10 mm.
- Strength – 50 mPa across the fibers with a thickness of 10 mm. Decreases when wet.
- Durability – 30 years.
- Price – 4 USD eat2 with a thickness of 10 mm.
The main characteristics of the FBS:
- Dimensions – length: 1500, 4400, 4900, 5600, 5700, 7700 mm; width: 1250, 1500, 1550 mm, thickness: 5, 7, 10, 12, 16, 18 mm.
- Weight – 12 kg / m2 with a thickness of 10 mm.
- Strength – 90 mPa across the fibers at a thickness of 10 mm.
- Durability – 50 years.
- Moisture resistance – very high.
- Price – $ 20 eat2 with a thickness of 10 mm.
Installation of sheets of moisture-resistant plywood is carried out in the same way as installation of sheets of other materials.
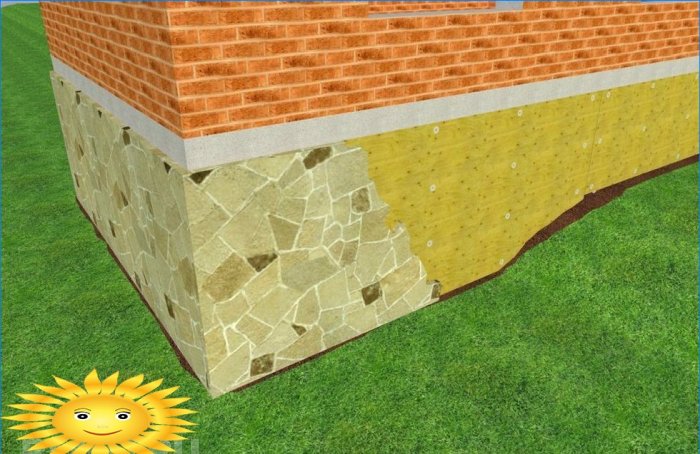
So, the material has been selected and the retaining wall has been built. Let’s start cladding the wall with stone.
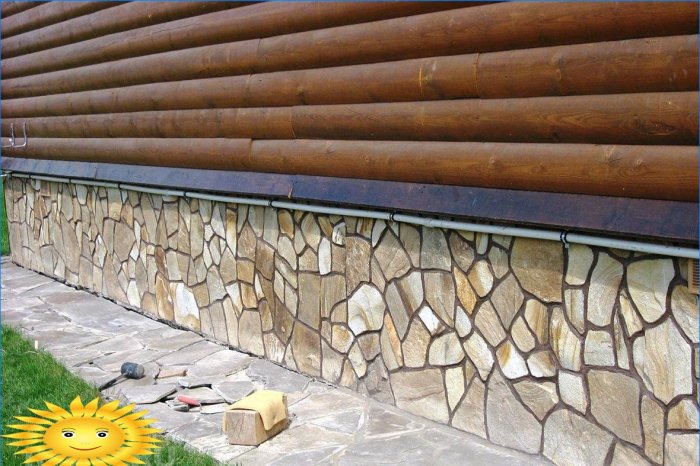
Facing the plinth with a stone
For cladding the basement wall can be used:
- Tile or facing stone with regular geometric shapes.
- Artificial or natural stone that does not have the correct geometric shape. In addition to sticking such a stone, an important part of the work will be the selection of the size and shape of various tiles..
In fact, the selection is like laying out a mosaic. How well this will be done will depend on what kind of seams are obtained between the stone tiles. Large seams can significantly spoil the appearance of the final wall..
It is far from always possible to find the right tile. Then it becomes necessary to trim the stone. This is done, as a rule, with a grinder. In this case, visible traces of trimming remain on the surface of the stone, which violates the natural appearance of the stone..
There is a way to avoid this. To do this, along the supposed cleavage line on the reverse side, recesses are drilled almost to the entire thickness of the stone with a step of 10 mm for curved lines and 20 mm for straight lines. After that, the stone is easily pricked along this line. From the outside, the chip will look completely natural. This method is quite time consuming, but adjusting the shapes of the tiles is not required very often..
Thus, by choosing a material and carrying out simple work, you can significantly improve the appearance of the house with a plinth lined with stone.


What are some optimal ways to arrange the basement in houses with a pile foundation? Are there any specific considerations or challenges that need to be taken into account?