Recommendation points
In this article: how to make your own children’s swing; stages of creating a sandbox and caring for its filler; building a children’s slide – a detailed analysis.
The desire of parents to provide their children with a full-fledged rest in the country is natural, but the question is inevitable – how to keep the child occupied in order to relax on their own? The issue cannot be resolved by just allocating a play area at a summer cottage; it is required to equip its landscape with play shells, which in itself is not cheap. We will save and equip the playground with our own hands, building a high-quality and reliable playground on our own.
Children’s swing – we build ourselves
In terms of popularity among children and adolescents, the swing is always in the first place, so every playground simply must have this play equipment. This article will help to determine the location of the playing area at the summer cottage, and here we will deal with the construction of the game shells. The task of constructing a swing can be divided into two subtasks – mounting the crossbar and creating a swing seat, with the fixing of the cords (racks) holding it on the crossbar.
As a crossbar for a children’s swing, you can use a horizontally located branch of a live (not dry!) Tree (of course, the branch should not be dry either), with a thickness of 100 mm and a length of at least 1,200 mm, a height from the ground of at least 2,500 mm. Fastening the rope cord of the swing to the branch is carried out through eye bolts passed through the branch and fastened with bolts, or with a rope loop – a rope made of nylon or hemp thread is laid in half, wrapped around the branch with its laid side, then the ends of both ropes that make it up are threaded inside the loop formed in the bend of the ropes, which allows you to get a self-tightening noose loop. The rope ends are then threaded through the holes prepared in the seat.
Under the racks to support the crossbeam, you can use tree trunks located at a distance of at least 1,500 mm from each other, the trunk diameter of which exceeds 300 mm. The crossbar can be made of a wooden bar with a cross section of 120 mm2 or from a water pipe with a diameter greater than 500 mm. In principle, you can attach a bar or pipe to tree trunks with 3-4 self-tapping screws 70-100 mm long on each side, however, if the owners of the site are worried that the trees may be harmed, then the crossbar is attached to the trees using a double rope noose.
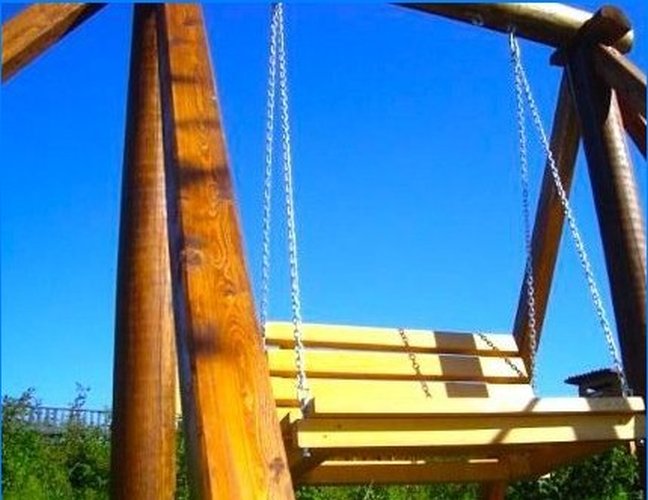
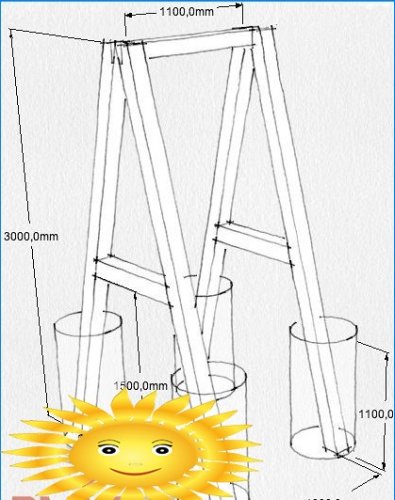
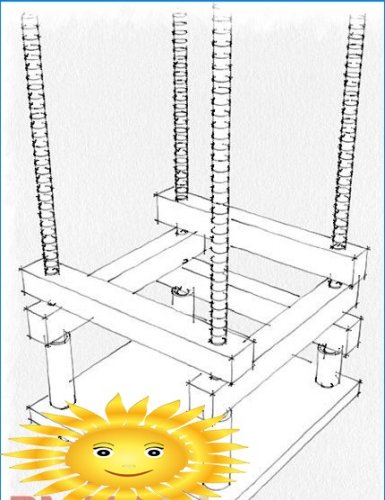
If there are no suitable trunks in the area of the summer cottage, where it is supposed to mark the playground, you will have to put up vertical posts, connect them with a horizontal crossbar and place the seat mountings on it. The design of the swing will be especially strong if each of its side posts is made not of one vertical, but of two bars arranged in the shape of the letter “A”. For each of these racks you will need: 2 beams with a cross section of 120 mm and a length of 3,000 mm; a bar for a horizontal crossbar, with a section of 100 mm and a length of about 1 100 mm.
First, you need to assemble the structure of the swing frame – on the upper parts of each pair of racks, a third is selected, adjusted to the bar of the crossbar. Then the paired posts are connected to the crossbar on the anchor bolt, for which a hole is pre-drilled. At 1,500 mm from the bottom edge of each post, a horizontal spacer is installed on the anchor, which increases their rigidity. Further, pits with a depth of 1,100 mm each are torn off under each of the side posts, the distance between the pits of the opposite posts is 1,000 mm. At the bottom of each pit, a 100 mm layer of gravel is poured and rammed. The swing frame rises, its racks are inserted into prepared pits – it is first necessary to cover the lower part of the racks with hot bitumen or Kuzbass varnish (about 1200 mm) to protect the wood from decay. Racks are placed – it is necessary to fill the free space in the pits with gravel to the top, then tamp. Fixing racks in pits requires special care, because the strength of the entire structure depends on it.
The width of the seat of a children’s swing is 400-500 mm, respectively, the attachments to the crossbar under the ropes holding it should be spaced from each other by this distance. To fasten the ropes, it is better to use eye-bolts with a one-piece eye – in this case, the rope holders of the swing seat are guaranteed not to jump off the crossbar. The swing seat can be purchased ready-made, usually made of plastic, made by yourself, or you can adapt a not too worn-out tire for it through four eyebolts passed through. It should be noted that a horizontally fixed tire, which has a very convenient hole in the center, is perfect as a swing seat – the child will not fall out of it, however, it will be inconvenient for him to swing independently.
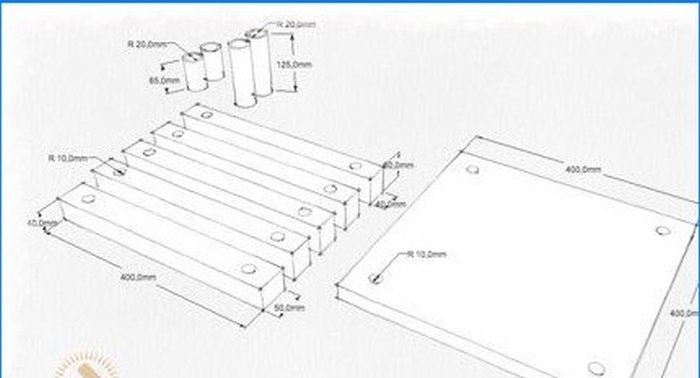
To independently make a seat for a small child that meets all safety conditions, you will need: four pieces of a metal tube with a diameter of 20 mm, two of them 65 mm long, the remaining two – 125 mm; square board or plywood under the seat, with a thickness of 25 mm and 4000 mm sides; five wooden planks 400 mm long, with a section of 40×50 mm. Drill 10 mm holes in the narrower side of the four strips, retreating 40 mm from each end. In the remaining plank, we also drill two holes, but already in its wider side. At the corners of the seat board, 40 mm from each side, we drill holes with a diameter of 10 mm. We carefully clean the seat plank and slats with emery cloth No. 0, at the end of this operation they can be covered with two layers of varnish or oil paint.
We proceed to the assembly of the elements of the seat and the swing itself – in each of the two holes located on the front side of the seat, we pass a rope and impose several knots at each end so that the ends of the ropes are guaranteed not to slip out of the holes. The assembly is carried out according to the scheme from the front of the seat to its back. Through each of the two ropes, we successively pass one tube 125 mm long and one side of the plank with a hole on the 40 mm side (each of them will be the side handles of the seat). Then a bar with holes in the 50 mm side is strung on both ropes (it will protect the child from falling off the swing in the forward direction). The rope ends are then passed through the eyebolt lugs and thrown freely downward.
It’s time to assemble the elements of the back side of the seat, strung on the ropes in the following sequence: the ropes are passed through both holes of the first plank (together with the second plank, they form the back of the seat); are inserted into the free holes of the side plates; the ropes are threaded through the second bar; each rope is threaded through 65 mm long tubes. Further, the rope ends are passed through the free holes in the back side of the board intended for the seat and “temporary” (!) Knots are tied on them. Why “temporary”? Because you need to make sure that there is sufficient distance between the suspended seat bottom and the ground. exceeding 350 mm. But to measure this distance, you first need to position the seat elements in their correct position, i.e. the backrest, sidewalls and faceplate should be in place, align the seat strictly horizontally. After making sure that this distance is sufficient, we form loops on the ropes near the eye bolt eyes, connecting both ropes with several moves of wire, thick rope or a clamp.
It is necessary to check the strength of the created swing – we put a load on the seat, the mass of which is three times the weight of the child, swing it for half an hour, while monitoring the behavior of the frame and ropes. Then we remove the load and assess the condition of the seat and, most importantly, the wear of the rope attachment of the swing, measure the distance from the bottom of the seat to the ground – has it decreased (if this distance decreases, it is necessary to replace the rope with a better one, i.e. not stretching). If everything is in order – the swing is ready, you can roll the child.
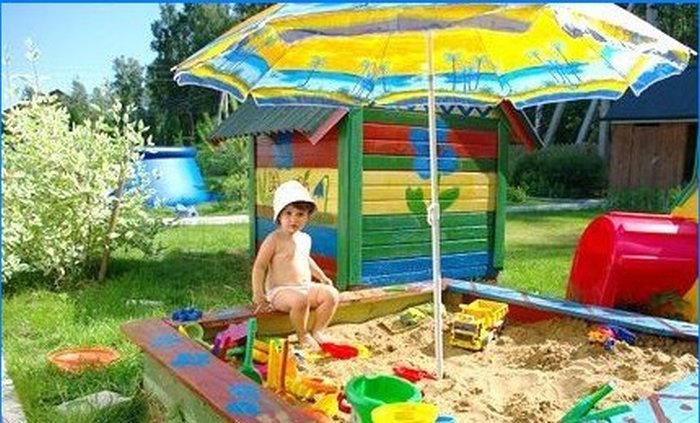
DIY sandbox
Parents for the most part treat the creation of a sandbox with insufficient attention, which ultimately turns into problems both in its design itself and with the health of the beloved child. Let’s figure out how to properly build a sandbox and take care of it.
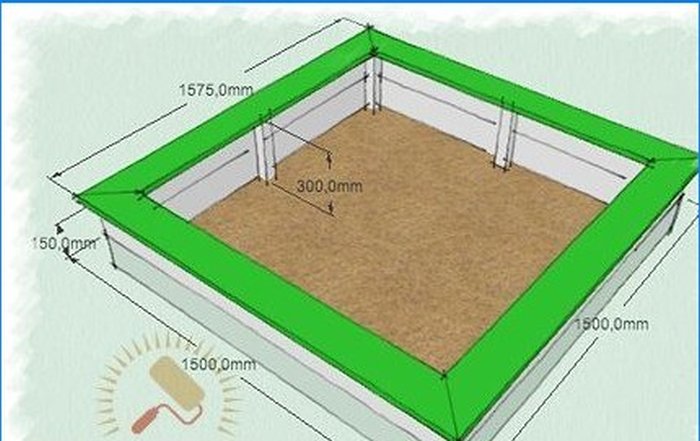
The creation of a sandbox begins with the choice of a place and its preparation – a square-shaped area with a 1,500 mm side is marked, soil is removed inside its perimeter to a depth of 150-200 mm. Excavation of the soil will remove the roots of the weeds, otherwise they will germinate and the sandbox will have to be weeded regularly. Then the entire area from which the soil was dug is covered with geotextiles – a measure, again, preventing the development of weeds. Sandbox boards are created from edged boards, with a thickness of 25 mm – the height of the board above ground level should be from 150 to 200 mm. Adjacent boards of the sides are connected to each other in half a tree, from the outside between the overlaps of the boards, a piece of square bar with a side of 50 mm is attached to the self-tapping screws, in addition, the same lengths of timber (to the height of the side of the sandbox) are mounted in the center of each side. From above, the sides are covered with an edged board about 150 mm wide, designed for the seat of children. In the corners, they are joined by a cut at 45about, fastening to the structure is carried out with self-tapping screws to the embedded timber – the projections of the plank seats inward and outward of the sandbox perimeter should be the same. After assembling the seats, their corners are rounded and sanded, all elements of the sandbox are painted in bright colors – red, yellow and blue, it is better if the color is not monochromatic, i.e. the sides inside and outside, as well as the seats, should be painted in different colors.
The sand mass is poured into the sandbox in a 200-300 mm layer, river sand is more suitable – its grain is larger than that of mountain (quarry) sand.
Important: Do not put wet sand into the sandbox, i.e. just from the river bank – it is necessary to keep it in the sun for at least two days, not allowing children to come near it!
The fact is that wet river sand can contain a whole zoo of microorganisms. ultraviolet light is fatal to microorganisms. So that microorganisms do not start up in the sandbox again, I do not recommend placing a permanent canopy over it – a temporary one is better. But the cover over the sandbox will be appropriate – it will provide some protection from volatile debris, animal and bird excrement.
How to build a children’s slide
At the stage of designing a children’s slide, we focus on the technical requirements of GOST 52169-2003 – safety issues are well covered in it. Structurally, the children’s slide consists of three elements – a platform, stairs leading to it and a slope. Let’s see how to create each of them and combine them into a safe slide.
The platform itself can become an interesting structure in children’s games, you just need to create a sufficient area. In addition, on the basis of the platform or under it, you can create a playhouse if you perform a roof over it and sheathe the walls. So, we put a platform with a platform of 1000 by 1000 mm, the height from the ground level is 2500 mm. To build it you will need: a wooden beam for the frame racks, with a section of 150 by 150 mm, in the amount of four pieces, 4 300 mm long each; timber with a section of 100 by 50 mm, length 5000 mm; timber with a section of 50 by 50 mm, length 4 200 mm; edged board 30 mm thick – 1.2 m2. As in the creation of a swing, it is required to prepare pits for the platform supports – in our case, they will be equidistant from each other by a meter distance, each tearing off to a depth of 1,100 mm. Having prepared the pits, we start assembling the frame for the platform and connect the bars with a thickness of 150 mm in pairs in pairs with meter lengths of 100×50 mm timber by three 120 mm self-tapping screws on each side. A staircase will rest on the first connected pair of 150 racks, and the slide on the second. Between themselves they will be connected by a railing beam, before placing them in the foundation pits, cut grooves 40 mm deep under it at a distance of 3,570 from the lower ends of the racks.
Having filled up a 100 mm layer of gravel on the bottom of the pits and tamped it down, we put the first pair of racks in them, fill the gravel up to the top, check the vertical position with a building level or a plumb line and, keeping verticality, tamp the gravel tightly. Then we proceed to the installation of the second pair of racks and repeat the operations of their installation in the pits. We connect the racks from the side of the stairs with the racks from the side of the ramp with a bar under the railing, inserting each of its sections into the prepared grooves and securing with two 120 mm self-tapping screws. We lay the edged board on the floor of the platform and install the railing crate – 3 beams with a section of 50 by 50 mm on each side with a step of 300 mm, fixing them with 70 mm self-tapping screws, the heads of which must be drowned flush with the railing. If you are afraid that the child may slip between the crate, then increase the number of battens of the crate to 5-6 pieces, reducing the step between them.
We take up the stairs. To save material and space, we will make it at an angle of 60o, bowstrings from a bar with a section of 100 by 50 mm, stair steps made of edged boards with a thickness of 30-40 mm, the width of each step is 150 mm, the distance between adjacent steps (step height) is 150 mm, handrails are made of beams 75 by 40 mm, lathing between steps and handrails made of 50 mm beams (step – at each step). In the bowstrings, grooves are cut out for the horizontal installation of steps, taking into account the angle of rise and 500 mm of the width of the stairs, the steps are fastened with 70 mm screws. The area next to the platform, where the ladder bowstrings will rest, is freed from turf and soil 15 mm deep and covered with gravel, then laid with a concrete slab or concreted. The ladder is attached to the platform with two anchor bolts.
A ramp for a children’s slide can be purchased separately – depending on the length and height, a finished plastic ramp will cost about 16,000 rubles. Expensive, so we will build the ramp ourselves. With a slide height of 2,500 mm, the minimum slope length should be 4,500 mm – it cannot be less, the angle of descent will be too sharp, which is fraught with injury. In addition, the descent should end with the fall of those rolling on the ground or sand, and have a gentle end, better with a slight upward bend. Getting started – for the frame you will need a beam with a section of 50 by 200 mm and a length of 10,000 mm, a beam with a section of 50 by 100 mm for a descent lathing, plywood 12 mm thick, sheets of galvanized steel 1.5-2 mm thick. The width of the slope is 500 mm, we place two pieces of timber 4,000 mm in length and a section of 50 by 200 mm at this distance from each other and fasten with 50 mm self-tapping screws on one side of a piece of timber with a section of 50 by 100 mm in increments of no more than 20 mm. The remaining 2 m of the 50 x 200 mm section beam will go to the gentle end of the descent. We install the descent ribs with the crate fixed to them on the platform using anchor bolts, without tightening them to the end – the descent structure will have to be removed once in order to fix the crate on the shallow bottom part after its construction. The lower part of the descent is not finished yet, so we raise it above the ground using bricks. Now it is necessary to create a gentle descent using the remaining timber – we build up the lower part of the trigger frame with an overlapping timber using anchor bolts, bringing the end of the descent not horizontally, but slightly upward. Then we fix the crate, under the area of contact with the ground we start a concrete slab, after having poured gravel under it and firmly connect the frame of the descent with the platform.
We form the flooring of the slide descent – we fasten plywood on 3.5 mm self-tapping screws, galvanized on top of it. If you use moisture-resistant plywood, then you can do without the surface layer of galvanized. We carefully study the constructed children’s slide – we carefully grind the railings, handrails and the side along the descent, several times we lower a 70 kg bag of sand along it. After making sure that the created structure of the slide is durable and after applying two layers of paint to its elements, we give permission for children to ride.
What are some simple and affordable do-it-yourself play equipment ideas for creating a fun children’s playground in a rural setting?