Recommendation points
- When and how to excavate
- Bottom and steps casting
- The best material for walls
- Lead-in cover
- Niches for tools and indoor workplace
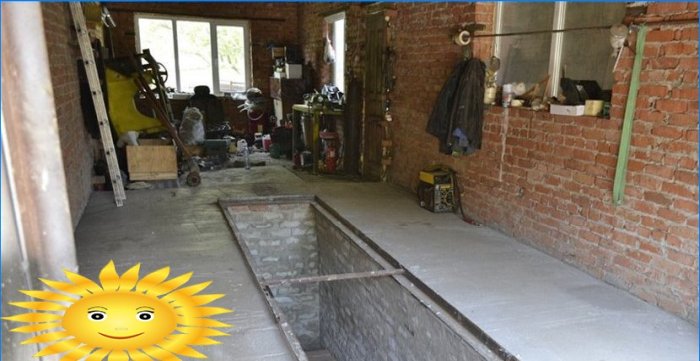
For a long and safe operation of the car, it must be serviced periodically. Therefore, a viewing pit is a priority addition for a garage. We will tell you how to properly arrange its arrangement in order to carry out maintenance with comfort and good mood..
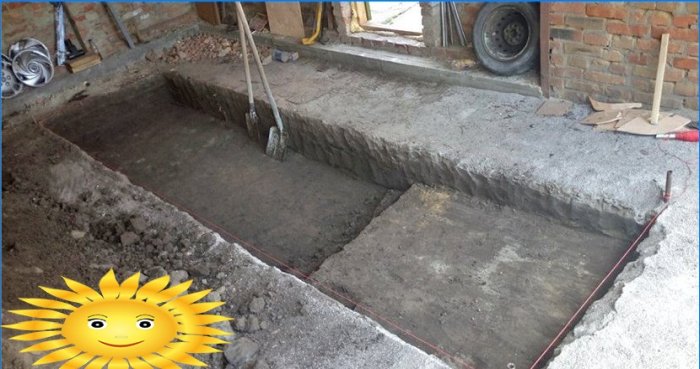
When and how to excavate
The main difficulties with the construction of a pit arise with a high level of groundwater. This makes it necessary to provide access to the back of the walls for waterproofing. There are many reasons to start excavation work and arrange a viewing hole even at the stage of pouring the foundation, although this, in principle, can be done at any time, even after several years of operation. It is just that a significant part of the floor may need to be dismantled for the installation of a wrap-around hydraulic lock..
Therefore, we offer you an option with a two-layer wall covering and a waterproofing device in the intermediate layer. Otherwise, the floor will have to be dismantled 25-30 cm wider than the pit box, and upon completion of the walls, the free space should be filled with crushed and moistened clay.
If waterproofing is installed between layers of masonry, an internal pit profile is cut into the floor, plus 50 mm on each side. After the pit expands by 25 cm in each direction, thus, the hard floor covering “hangs” over the walls and is preserved. Of course, if the floor is made of piece materials such as brick or paving slabs, it is much easier to move the floor area around the pit, but in the case of asphalt or concrete screed, it is recommended to keep the coating.
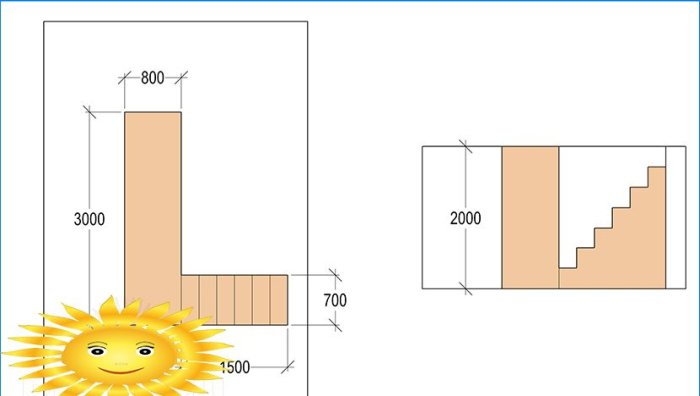
A pit for a pit is dug in the same way for a garage under construction and for a used one. With a net width of the pit of 80–85 cm, the pit will come out 125–135 cm, the length corresponds to the size of the car, plus an additional one and a half meters for the entrance part. The depth of the pit is chosen according to its own height plus 35-40 cm.
An extremely useful element of the inspection pit is the turning part on the side, where the steps for the descent are located. There is an opinion that it is the L-shaped pit that should be initially: a more convenient entrance and the ability to shorten the length of the pit in a small garage.
Bottom and steps casting
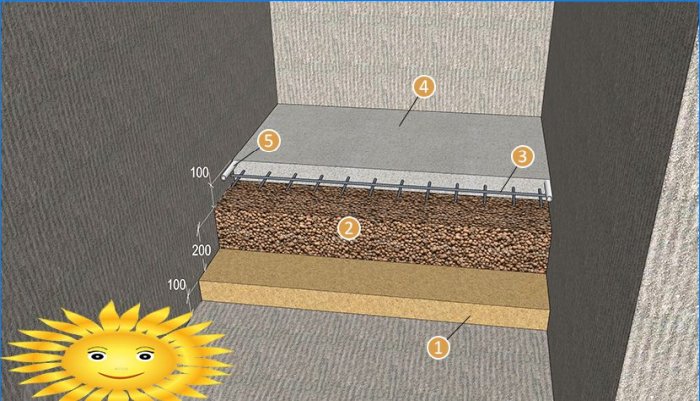
The backfill for the pit floor includes a clay lock 10 cm thick and a 20 cm layer of expanded clay, which is rammed, sprinkled with sand and spilled with water. In the corners along the pit, two inch pipes are laid, through which cords are passed, the ends of which are taken out of the pit and temporarily tied. Pipes are installed in the ground plane of the floor, paved with cement mortar.
A monolithic reinforced concrete slab is cast on the pit floor. Reinforcement is carried out with a 10 mm mesh of profile reinforcement with a row spacing of 10–12 cm. Protective layers – at least 45 mm on each side. The composition is as follows: one part of cement and sand, two and a half parts of expanded clay, add water until a semi-dry rolling mass is formed, the filler granules must be completely covered with cement milk. If you order a mixer – take brand 400, it is optimal. Concrete is fed in small portions and leveled with a rail along the beacons, upon completion of the work, the beacons are pulled up by the cords.
Filling the floor: 1 – clay; 2 – expanded clay with sand; 3 – reinforcing mesh; 4 – concrete screed; 5-inch pipe
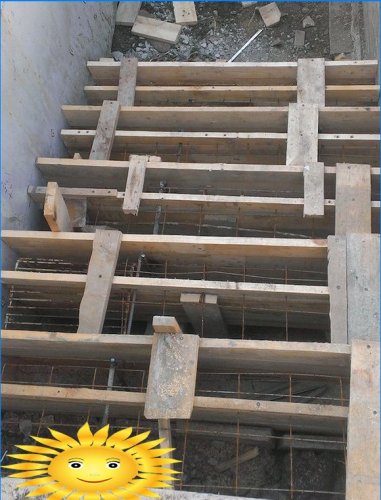
A pit for the entrance part is dug out with a rather steep (45–60 °) inclined bottom, covered with two layers of roofing material with a fold over the side walls. On top of the waterproofing on the plugs, 14 mm rods of profile reinforcement are mounted with a bottom protective layer of 40 mm, side layers of 70 mm and an installation pitch of 150 mm. The steps are formed by formwork from OSB or knocked down board boards up to 30 cm high. The staircase has only 7–8 steps, 20–25 cm each, thus, in the projection, the length of the lead-in part is 150–180 cm. The lower step has an incomplete height and is often made a little wider than the rest. The details of the formwork are held together by common longitudinal bowstrings and are additionally reinforced with rectangular scarves between themselves.
The staircase is filled in two stages. On the first, the bed is poured: concrete is slowly fed from the top until it reaches the bottom step. While the composition is still “alive”, sections of the plaster mesh bent with the letter G are inserted into the formwork of the steps so that the outer protective layer is 15–20 mm. Filling of steps is carried out from the bottom up a few hours after the start of hydration of the mixture or the next day.
The best material for walls
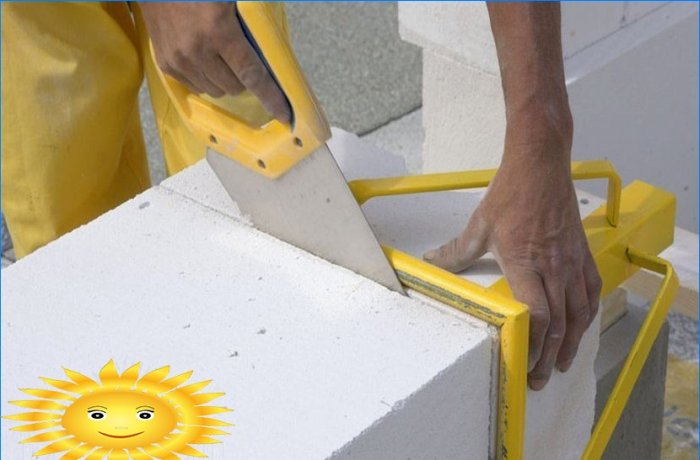
Pouring a monolithic reinforced concrete pocket seems to be the simplest and most cost-effective way to finish a pit, but is it really so? At many modern repair and maintenance stations, such a device has long been abandoned so as not to work for a long time inside a damp and cold concrete bag. Instead, the pit is lined with cut blocks of foam concrete. This material has many advantages: it is lightweight, warm, due to the large size of the blocks, the work is greatly accelerated.
Laying begins with the outer layer. It is made with cut foam concrete 50 mm thick, in the absence of such a brick put on the edge is used. The masonry is lacing and periodically checked with a 125 cm long strip for wall convergence. The gap from the ground is rubbed with broken brick or crushed stone every two rows, from the inside, protruding mortar residues should be removed. After drying, the rough masonry and the floor are covered with three layers of coated bitumen insulation. On the not yet dried top layer, it is possible to paste over the pit with expanded polystyrene plates, if required by the heat engineering calculation of the floor.
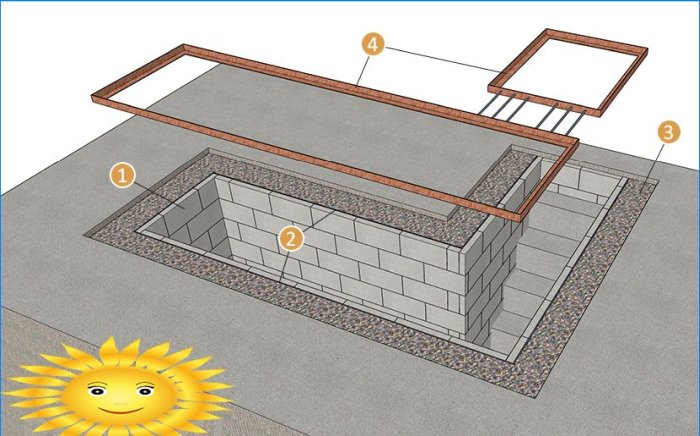
1 – foam block masonry; 2 – waterproofing; 3 – rubble masonry (broken brick or crushed stone); 4 – corner 50x50x4
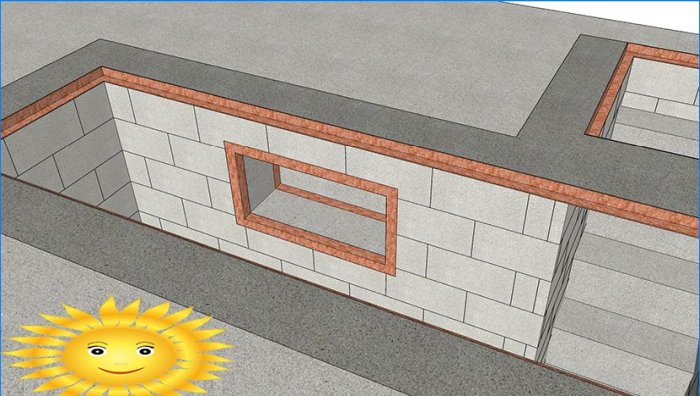
In order for the walls to be flat and erected quickly, a frame should be made in advance – a frame made of steel corners with a shelf of 50 mm, turned by an internal angle to each other. If there is a side entry part, the frame for it is assembled and mounted separately with an indent of 40 cm from the pit frame. But until the laying is completed, the frame from the corners will act as a template, the blocks should be aligned along its inner side.
First, they put the first inner row: sequentially along the perimeter of the pit, you can first scratch the lines of the inner perimeter on the floor. When the first row is completed and the scheme for further laying and trimming of extras is known, the walls are erected along the frame. First, two corner stones are laid, they are leveled with a water level. Next, dry blocks are installed on the walls, and on top of them are small plates of 10 mm plywood. The frame is lowered from above, the stones are brought under it and aligned both horizontally and in height.
It is not necessary to check each row in the frame, you can skip one or two and focus on the rack level. After the last row has been laid, the frame is positioned and aligned on the mounting wedges so that the top shelf is flush with the floor plane. The resulting gaps should be immediately repaired with cement mortar. We will talk about the functions of this framework later..
Lead-in cover
Difficulties in drawing up a layout scheme arise when the side walls of the lead-in part are arranged. If you have the opportunity to cut foam concrete – cut blocks along the step height minus 10 mm.
If you are using a standard block 200x200x400 mm, pre-cast the stair treads with a height of 275 mm. Start the lining from the bottom step, here you will have to trim the minimum number of extras. Each row should come out flush with the step, that is, 275 mm includes:
- centimeter seam solution;
- a row of masonry in one brick, flush with the inner plane;
- mortar seam again
- half block row.
We said that the frames of the pit and the lead-in part do not adjoin each other tightly, the indentation is necessary to fill the reinforced strip flush with the floor, allowing the wheel to run over. The frames are connected with 100 mm smooth reinforcing rods. The formwork is tied to the reinforcement on the wire, while maintaining the lower protective layer of 50-60 mm, the sides are sewn up on the sides.
Niches for tools and indoor workplace
In conclusion, we offer some useful additions for the viewing pit. It is very important that during work the entire tool is at hand, and you do not have to bend over it. Therefore, it is recommended to make two frames from the 50th corner, the internal dimensions of which will be multiples of the dimensions of the blocks used. The frames are welded with shelves outward, so each of them surrounds the opening. Place niches starting with the second row on top or below.
Lay the lengths of the corrugated tube with the cable inside in advance to place 2-3 pairs of outlets in the pit. If you plan on using pneumatic equipment, or simply want to be able to repair and fit large parts without leaving the pit, plan for a covered pocket just over a meter deep and wide. It can accommodate shelves with everything you need, a small workbench with a vice and a compressor, but you definitely need to organize lighting.
It is convenient to cover the pit with roughly knocked down board shields inserted into a frame from a corner. Conventionally, they should be square, but one side is 150 mm shorter than the other, so that the shields can be removed and thrown onto the pit floor as a pallet, and a stack of several pieces can be used as a stool. Do not forget also that in order to avoid the spread of mold, the walls and shields must first be treated with an antiseptic, and then with water dispersion paint or indelible whitewash.

“Are there any specific guidelines or considerations I should be aware of before building a DIY inspection pit in my garage?
Yes, there are a few guidelines and considerations to keep in mind before building a DIY inspection pit in your garage. Firstly, ensure you have enough space to safely construct the pit without compromising the structural integrity of your garage. Obtain any necessary permits or permissions from your local authorities before starting the project. Plan the layout carefully, considering the size and depth of the pit and ensuring it provides sufficient working space for yourself and any equipment. Keep safety in mind by ensuring adequate ventilation, proper lighting, and using non-slip materials for surfaces. Adequate drainage and access points for maintenance should also be considered. Consulting with professionals or experienced builders could provide valuable advice to ensure your DIY project meets standards of safety and functionality.
I’m curious to know, what are the steps involved in building a do-it-yourself inspection pit in the garage? Is it a complex process or can it be done with basic tools and materials? What are the essential safety precautions one needs to consider while constructing and using such a pit? Any advice or tips from someone who has experience with this would be greatly appreciated!