Recommendation points
- Stage 1. Design development and model creation
- Stage 2. Procurement of material and organization of the workplace
- Terms (vocabulary)
- Room and tool
- Stage 3. Manufacturing of parts
- Pilaster making
- Making a frieze
- Manufacturing of frieze linings
- Making a sandrik
- Making the main template and preliminary assembly
- Stage 4. Installation and painting
- Installation and adjustment of cladding elements
- Installing the template on the wall
- Painting parts
- Final assembly
In this article, you will learn how to decorate the front of the fireplace with wooden carved elements yourself. We will tell you about the rules for calculating the template, the nuances of installation and fitting, impregnation and painting of parts. The article indicates the main dimensions and assembly principle of the portal structure.
The fireplace is an attribute of luxury. In most cases, its device is associated with important and expensive work. The final stage – facing – requires a carefully thought-out design and high qualifications of the master. We will divide the finishing work on the fireplace into stages.
Stage 1. Design development and model creation
Note. To create a three-dimensional model, you will need the skills of a specialist in working with the program Google SketchUp.
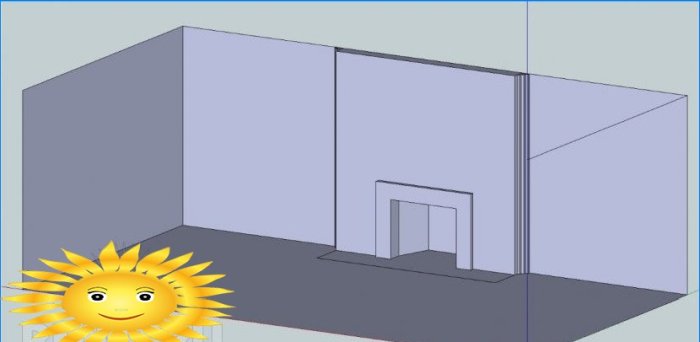
When developing the design, we take into account that the fireplace itself is already arranged according to all the rules and has protective heat-resistant surfaces in the right places. The hearth and chimney of the fireplace also work as intended. In order to accurately calculate the dimensions of the fireplace portal, we recommend using SketchUp. This will help balance the elements and see the layout of the finished result..
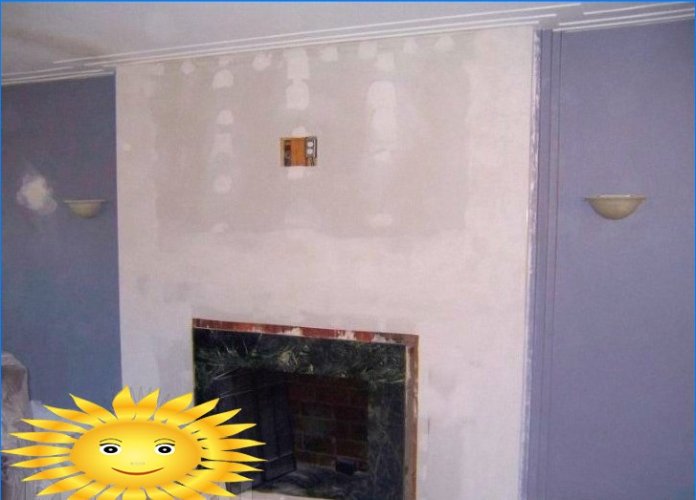
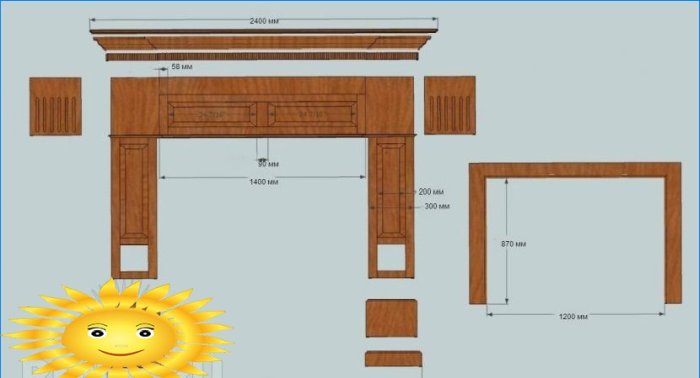
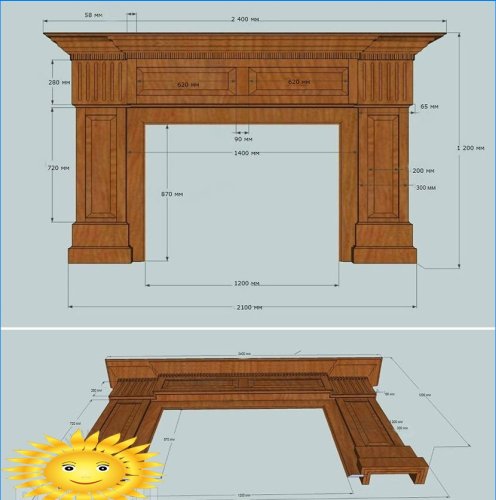
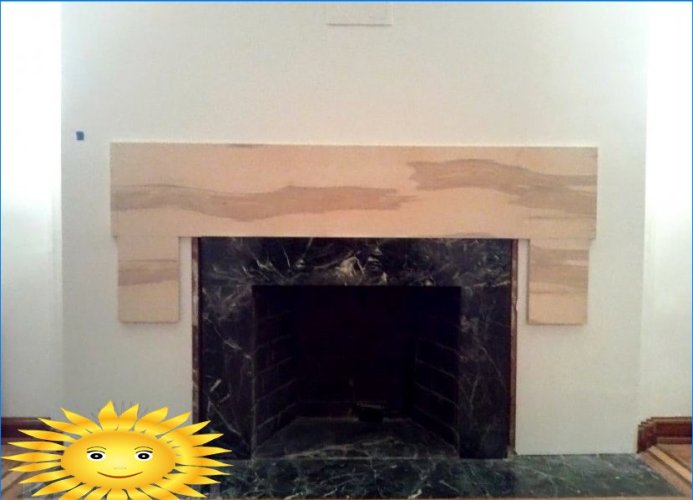
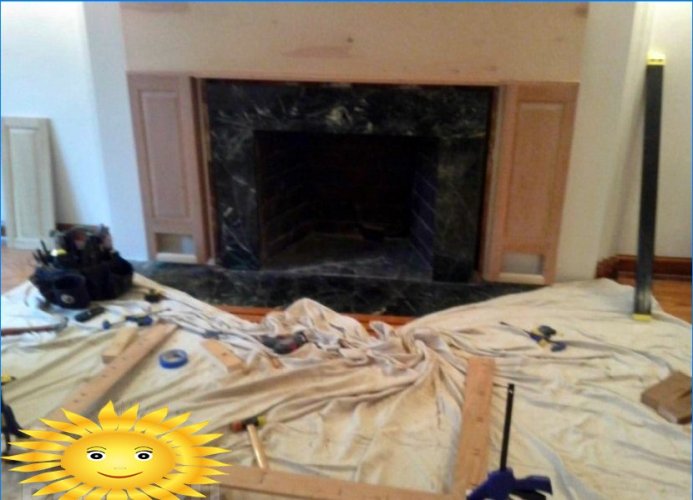
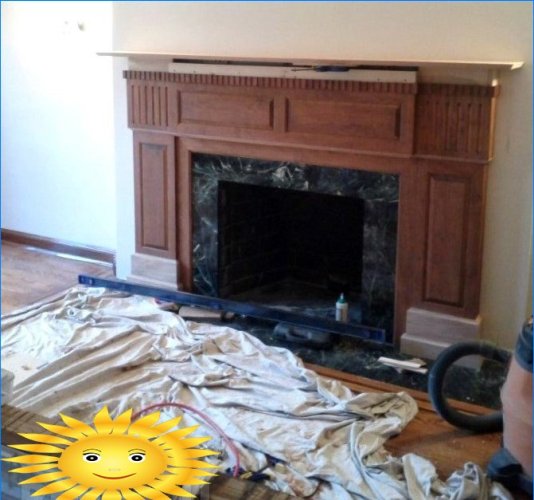
Initial (original) view of the fireplace wall:
We create the space of the room in the program and arrange the fireplace according to the real dimensions.
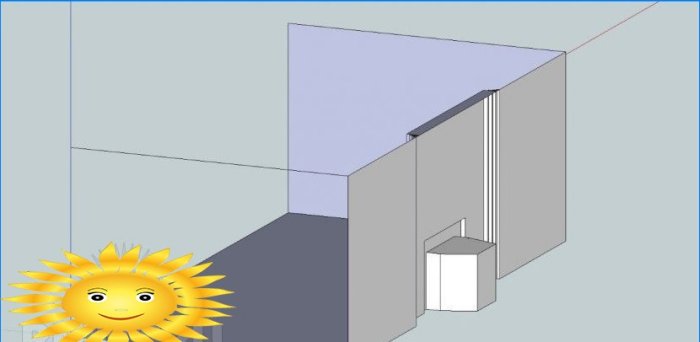
The program provides the ability to insert real photos of the interior for greater realism. The fireplace model can be entered into the interior and see the version of the final look of the room (fireplace wall).
In the program, you can perform detailing and see how the elements are combined with each other, which dimensions.
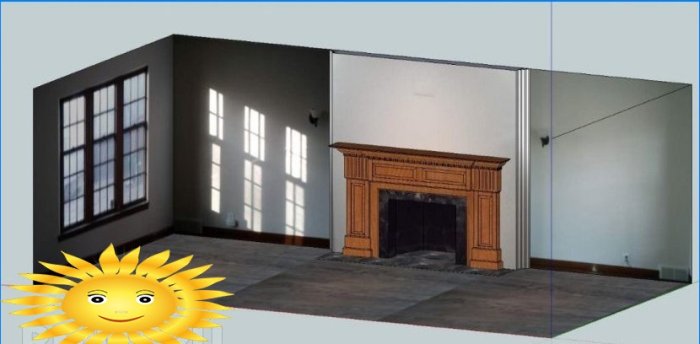
After each element has been worked out, they should be put together in a three-dimensional model, and measured. Now the model can be rotated and tilted at different angles, which allows you to detect and eliminate minor design flaws.
Stage 2. Procurement of material and organization of the workplace
First of all, you need to decide on the terminology and distribution of work. Perhaps it would be better to entrust some of the work to the professional carpenters working in the workshop. But in this case, you will need knowledge of the nuances and names of parts..
Terms (vocabulary)
In our case, we chose an aristocratic appearance in a wooden version. This format implies the presence of traditional medium-sized elements:
- Frieze is a form of surface finishing. In another way, it is called a panel or rust.
- Sandrik – intermediate border from a small-piece pattern.
- Corrugated panels – plane elements with straight slender relief.
- Pilaster or false column – a vertical decorative element that looks like a column.
- Bottom overlay or false support – an overlay that gives visual massiveness to the bottom of the pilaster.
- Finished decorative panels, inserts, profiles – trim parts with a straight longitudinal pattern (or without), made on a profiling machine (thickness gage).
1 – frieze; 2 – sandrik; 3 – corrugated panels; 4 – pilaster; 5 – overlay of the pilaster; 6 – profile to eliminate the gap; 7 – decorative insert
Our site has already talked about the choice of wood species.
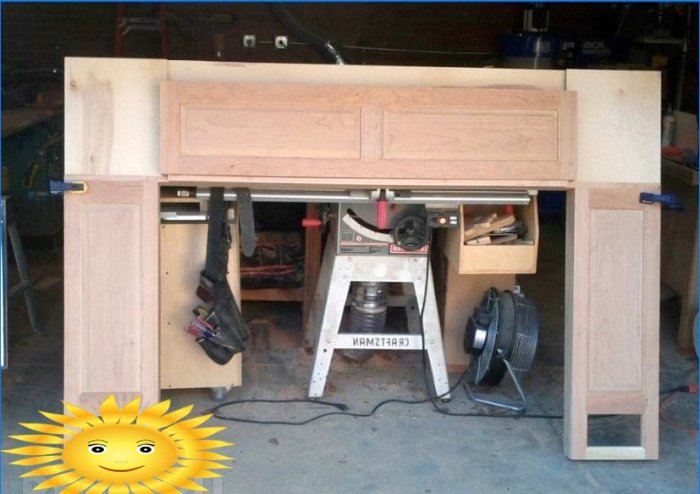
Room and tool
To create a massive wooden façade, a separate work area with good lighting and ventilation will be required. The workbench must be reliable, stable and strictly horizontal in all directions. The workbench cover should allow the stops to be secured. The room should have a constant room temperature and normal humidity.
To make the elements, you will need the following tool:
- Manual electromill with a full set of attachments.
- Stationary circular saw with “clean cut” disc (42 teeth). You can install a manual circular on the workbench.
- Screwdriver.
- Jigsaw.
- Grinding machines – belt and vibration.
- Clamps with protective pads.
- A set of carpenter’s tools – mallet, incisors, square, sweep, etc..
For installation, you will additionally need:
- Impact drill with 8 mm dowels.
- Vacuum cleaner, rags, wood screws 35 mm.
Consumable material:
- Sandpaper, grain 120 – 0.5 sq. m; grain 240 – 0.5 sq. m.
- Belts and discs for grinding machines, grain 120 and 240 – 3 pcs..
- Joiner’s glue D-3 – 0.5 kg (or equivalent).
- Turpentine – 0.5 l.
- Spindle or linseed oil – 0.5 l.
- Stain of the selected tone – 0.5-1 l.
- Wood varnish – 1 l.
- Masking tape 30 and 50 mm.
Since the fireplace portal is finished after finishing the room and laying the flooring, you should not count on using the fireplace room itself for the workshop.
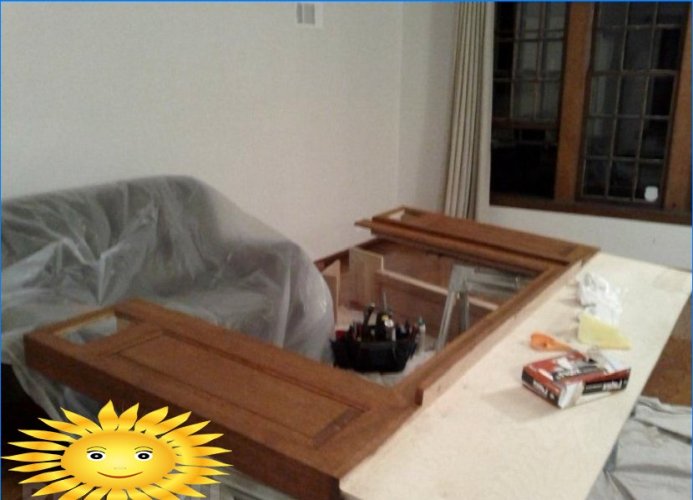
Stage 3. Manufacturing of parts
Note.For the production of elements, you will need the skill of a carpenter and knowledge of the nuances of the main tool – a manual electromill.
If this is your first time dealing with such work, we recommend hone your skill on cheap wood – pine or birch. The main problem of prefabricated joinery is the inconsistency of parts due to poor-quality cutting of seats. Test all cutters on prototypes and get the best fit.
All workpieces must be sanded beforehand. If you purchased a board that has undergone basic sanding, use a vibrating sander with a 240 blade.
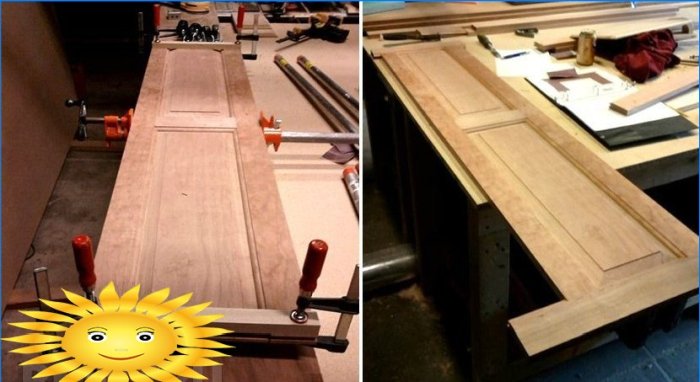
Pilaster making
The front panel of the pilaster has a paneled structure and consists of two elements – a frame (frame) and an insert. You will need two shields in total.
The frame is created from a 60 mm wide board.
1. Cut the frame elements into an approximate size (+30 mm).
2. We pass the cutter “half-step” 20 mm along the entire length. Select the cutter along the radius of the groove empirically, based on the size of the picture.
3. Determine the location of the transverse ribs on parallel posts (3 ribs) and mark the size of the pilaster itself in height.
4. We mill the edge of the rib and the seat on the rack so that they are installed “dry” without gaps. Use an end mill for this. In our case, a 15 mm spike is enough.
5. Cut out all three ribs and footprints for them.
6. Insert the first edge one by one, then the pilaster panel, the second and third edges. One opening will remain empty – in the future it will be covered by the lower overlay.
7. We adjust with clamps strictly in size. If there is a mismatch, we trim the remains of the tree.
8. We make the assembly with glue.
Attention! Make sure that the glue does not get on the front surface – it penetrates deeply and can give visible smudges when stained (stained). Most joinery adhesives set after 3 hours..
9. Cut the edge of the pilaster from a board 100 mm wide. One side should be chamfered at 45 °. It is better to do this with a circular saw (the jigsaw will not give a smooth, accurate stroke – there is a risk of spoiling the workpiece).
10. We remove the chamfer of the pilaster shield so that it joins at 90 ° with the edge.
11. We join the rib and the shield first with a test (dry), and then with glue.
Making a frieze
Frieze – upper transverse panel – similar to pilasters in drawing and assembly principle.
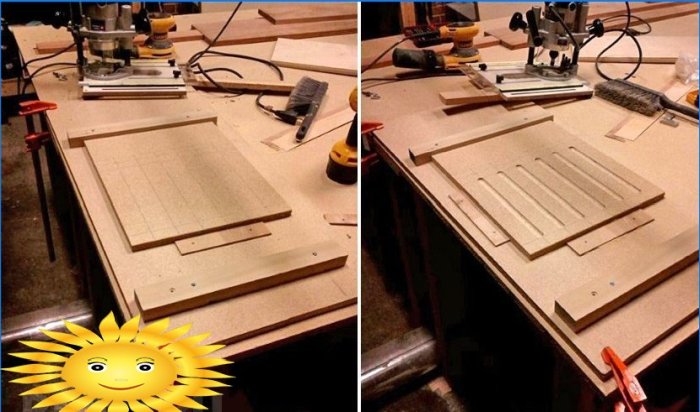
Manufacturing of frieze linings
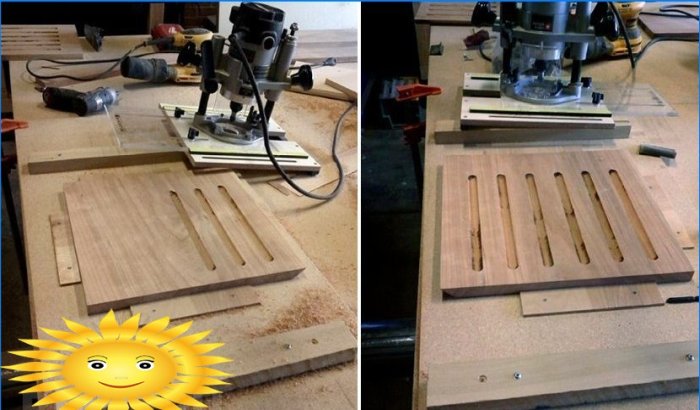
For overlays we need a board 225×280 (2 pcs.). As conceived, parallel straight grooves with rounded edges, which are called flutes, will be cut in it..
Attention! Practice on chipboard or plywood.
1. We mark the flutes (width 20 mm).
2. Cut with a side mill 20 mm along the markings.
3. Grinding the front surfaces with grain 240.
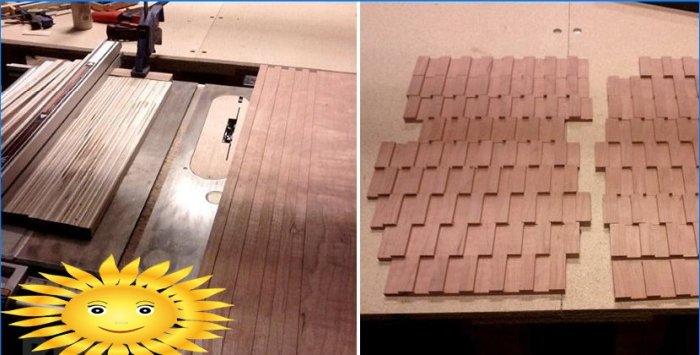
Making a sandrik
This decorative element in our case has a simplified form – alternately protruding rectangular elements. It can be made in three different ways:
- cut small rectangles to size and lay out the sandrik;
- cut strips (planks) of a given width and stick them on the base (board or chipboard), then cut across;
- select grooves of a given depth with a milling cutter in the board and cut the strips across, then make them in length.
The third option is the simplest and fastest for us, since it is possible to use a cutter.
1. We mark grooves with a width of 30 mm and go through with an end mill to a depth of 20 mm.
2. We cut cross strips 40 mm wide.
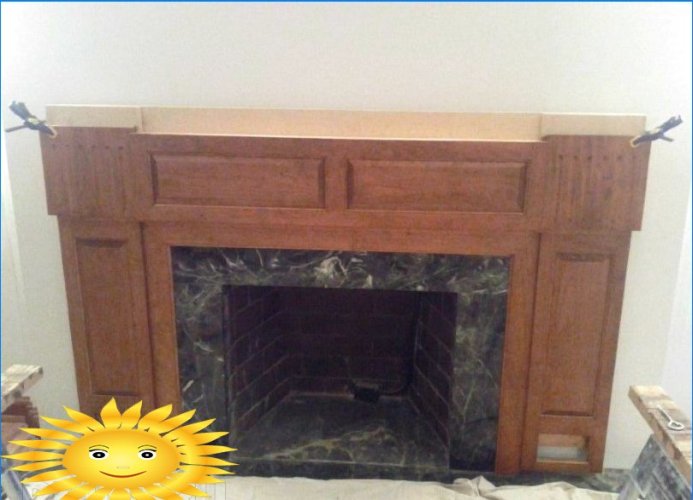
The main elements of the fireplace facade are ready. Remaining details – pilaster base plate and strips – are cut and installed last.
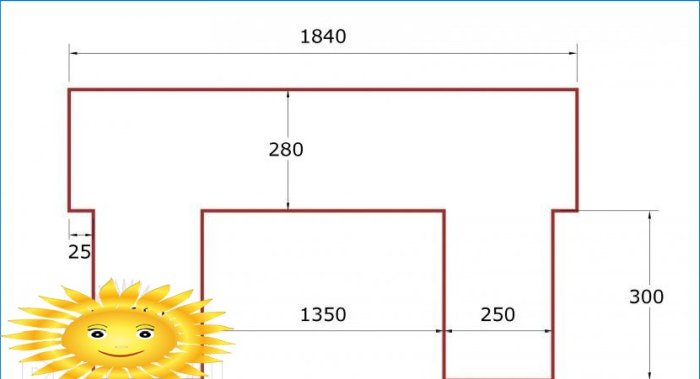
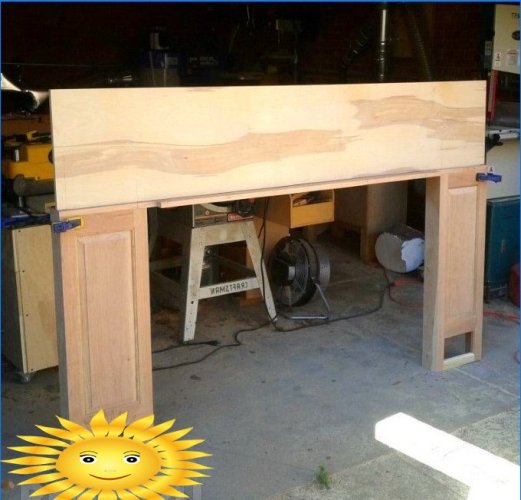
Making the main template and preliminary assembly
A template or a piece is a U-shaped element of the portal construct, on which, in fact, the whole structure is held. It will consist of two parts – the main one (under the pilasters and frieze) and the inner part (under the framing of the hearth).
The main template is made according to the internal dimensions of the model and already manufactured elements.
Attention! Before cutting the template to the dimensions taken from the virtual model, be sure to check the actual dimensions – they may differ. Correction in this case – according to real dimensions.
In our case, the dimensions will be as follows:
- plywood thickness – 18 mm;
- the height of the transverse “crossbar” – 280 mm;
- width of vertical elements – 300 – 2 x 25 = 250 mm;
- sufficient height of vertical elements – 300 mm;
- internal distance between vertical elements – 1400 – 2 x 25 = 1350 mm;
- outer “step” – 25 mm.
For preliminary adjustment, we set the template to the level at a given height, i.e. in the design position.
Stage 4. Installation and painting
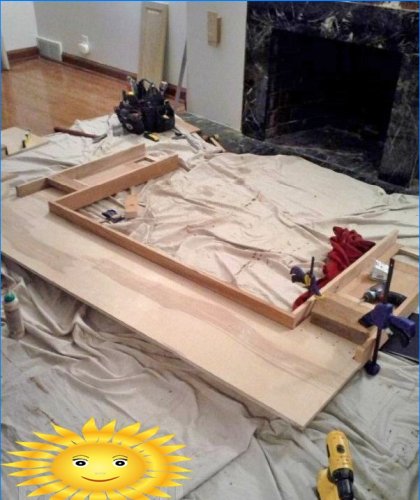
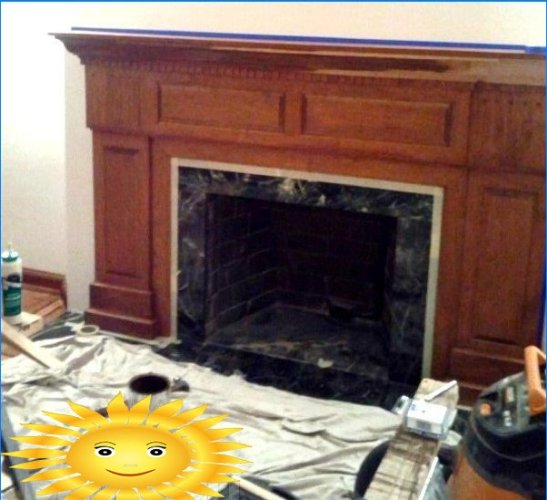
Installation and adjustment of cladding elements
We fix the finished elements to the pattern with clamps and check the volume. The appearance is often corrected “by eye”, since the appearance of the virtual model is still different from the real sample. To fit the template, we glue plywood and planks pads. Pilasters must be exposed, carefully fitted and fixed to the template with glue and self-tapping screws.
On the mantel wall on the back of the pilasters, we fix the thrust bars. On the pilasters themselves, we install the inner framing of the hearth from a 60 mm board.
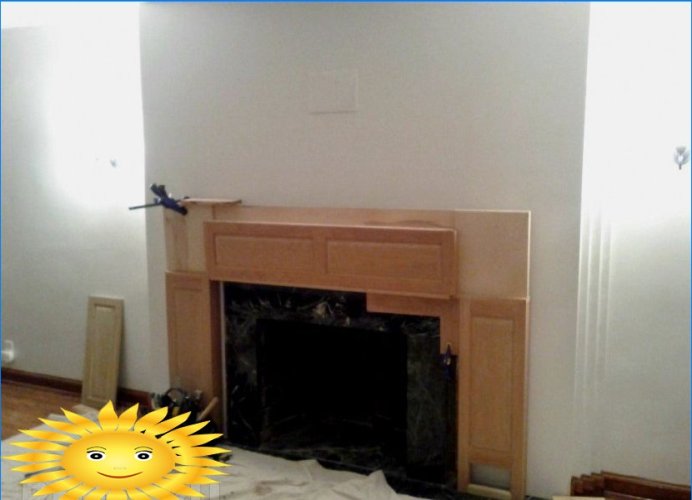
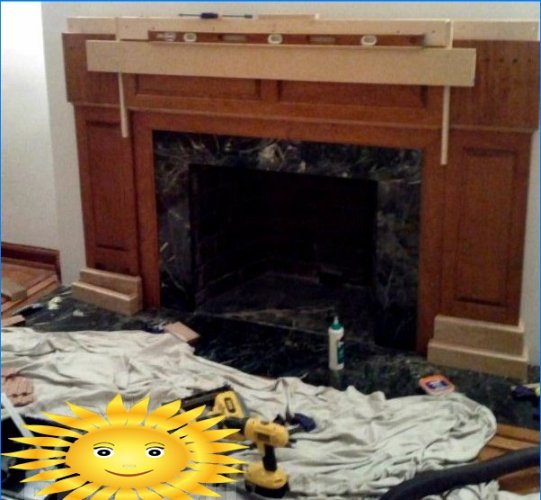
Installing the template on the wall
Key moment. We expose the template to the mantelpiece, center it using levels, squares and rulers.
Attention! At this stage, even the slightest distortions are unacceptable – they will be visible on a span of 2.4 m.
We fasten the template to the wall with dowels using self-tapping screws. In this case, it should remain possible to remove the structure for painting.
We measure in place the size of the inner frame element. We make it from plywood strips.
Painting parts
We dismantle the structure from the wall. As mentioned above, all parts must be sanded with fine sandpaper of 240 grit. After finishing, removing minor defects (if any) and thoroughly removing dust, we process the front surfaces with turpentine or solvent. After it evaporates, apply a layer of oil. Then we cover with paint.
Final assembly
After complete drying of the painted elements, we install the structure to the design position.
Then we make the bottom pads for the pilasters. This work is only done locally to minimize the chance of gaps if distortion occurs..
At the same time, we check the correctness of installation by level and visually. We install the side plugs (strips) and the internal element of the template.
We glue the sandrik strips and install the top “cover” on the glue using clamps.
We insert a decorative profiled board between the sandrik and the “lid”. We paint the remaining planes, eliminate color defects (if any). Upon request, after final assembly and painting, the structure can be varnished.
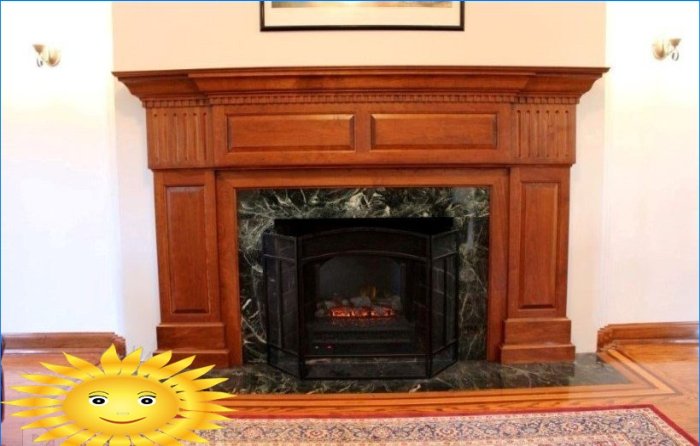
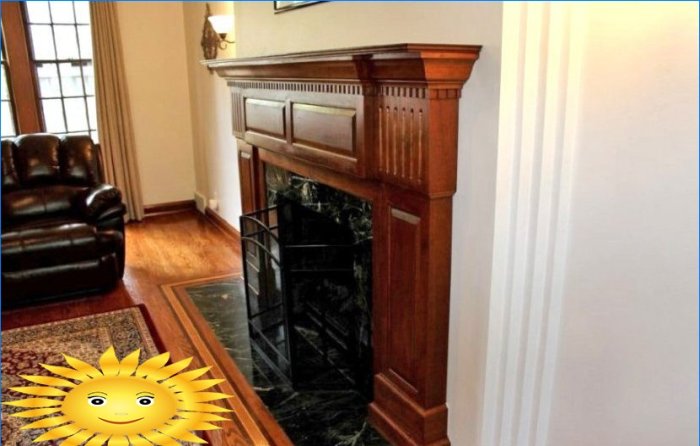
The final look of the product:
The beauty of wood finishing of the fireplace is undeniable, while the appearance can be varied using various elements of the wood profile and create your own design.

This text seems intriguing and I would like to know more about making a portal made of wood. Can you provide further details on the process involved? How do you ensure its stability and durability? Are there any specific tools or techniques required?
Making a wooden portal involves several steps. First, you need to choose a durable and stable wood type, such as oak or teak. Design the portal, considering its purpose and aesthetics. Then, take accurate measurements and cut the wood accordingly. Assemble the pieces using strong joinery techniques like mortise and tenon or dovetail joints. To ensure stability, reinforce the structure with braces and use the appropriate hardware, like hinges and locks. Finishing the wood with sealants or stains will enhance its durability and protect it from weather damage. Specific tools required may include a saw, chisel, drill, and various measuring tools. Techniques like planing, sanding, and carving might also be used based on the design. It is recommended to refer to woodworking guides or consult experienced individuals for detailed instructions.
Making a wooden portal involves selecting durable wood, designing the portal, measuring and cutting the wood, and assembling it using strong joinery techniques. Reinforcing the structure with braces and using appropriate hardware is important for stability. Finishing the wood with sealants or stains will protect it from weather damage. Specific tools like a saw, chisel, drill, and measuring tools are needed, and techniques like planing, sanding, and carving might be used. It is recommended to refer to woodworking guides or consult experienced individuals for detailed instructions.
Making a wooden portal requires selecting quality wood, designing, measuring, cutting, and assembling it with strong joinery techniques for stability. Reinforcing with braces and using appropriate hardware is crucial. Finish with sealants or stains for weather protection. Essential tools like a saw, chisel, drill, and measuring tools are needed, along with skills like planing, sanding, and carving. It’s advisable to follow woodworking guides or seek advice from experienced individuals for detailed instructions.
Building a wooden portal involves several steps. First, determine the size and design of the portal. Gather the necessary tools such as saws, drills, screws, and measuring tapes. Measure and cut wooden boards according to the desired dimensions. Construct the frame by attaching the boards together using screws or dowels. Ensure stability by reinforcing joints with brackets or corner blocks. Add horizontal and vertical support beams to strengthen the structure. Attach additional panels or decorative elements as desired. To enhance durability, consider treating the wood with a sealant or paint to protect it against weather elements. Regular maintenance like reapplying sealant or protective coatings can further extend its lifespan. As for tools and techniques, basic woodworking skills are needed, and specific tools like a miter saw for precise cuts or a biscuit joiner for stronger joints can be helpful. Research and follow appropriate safety precautions while working with power tools or sharp objects.
I’m curious to learn more about the process of creating a wooden fireplace portal. What type of wood is typically used for this project? Is it a complicated task? Any tips or recommended resources for beginners who want to give it a try? Also, what are the benefits of having a wooden fireplace portal compared to other materials? Thanks in advance for the insights!