The content of the article
- Wall preparation
- Removing old wallpaper and paint
- Primer and putty of walls
- Tools and materials
- Wallpaper selection
- How to calculate the right amount
- Methods of cutting cloths
- Where to start
- Proper Wallpapering
- Paper
- Non-woven
- Vinyl
- Ceiling
- Photowall-paper
- How to glue wallpaper in the corners
- Around doors, windows and behind radiators
- How to fix errors
- Pattern mismatch
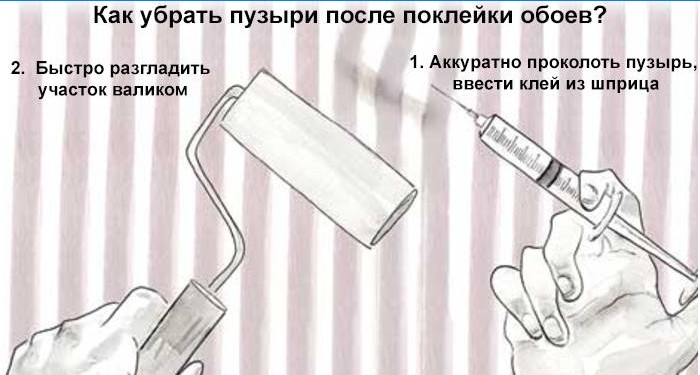
- Bubbles and creases on the wallpaper
- Peeling
- Gaps in the corners
- Joints
This process needs to be taken seriously. Wallpapering the walls can end unsuccessfully even due to minor errors. They prematurely exfoliate from the surface, “bubbles” appear under the canvases or distortions of the strips occur. Detailed instructions and recommendations of professionals will help to avoid such problems..
Wall preparation
The surface must be flat, without decoration – old wallpaper, paint or whitewash. Remove baseboards, platbands, facing panels of sockets, switches.
After removing the old finish, smooth the surfaces with a primer – repair cracks, cavities, other defects.
Removing old wallpaper and paint

How to remove different types of previous coverage:
- Paper. Draw warm water into the spray bottle, apply it to the surface. When the paper swells, remove it with a paint spatula..
- Non-woven and vinyl. Scratch the surface, moisten it with warm water, after half an hour remove the decorative layer with your hands or with a paint spatula.
- Washable. Wet the surface with warm water, remove the first layer of wallpaper. Wipe up any remaining paper after treatment with a steam generator or steam iron.
The order of removal of dyes, whitewash:
- Paint. Treat the wall with a blowtorch or a building hair dryer. When the coating swells, scrape it off with a spatula. If there is no lamp and hair dryer, clean the surface with a scraper, a metal brush or a grinder with a special nozzle.
- Whitewash. Moisten the surface with warm water, then remove the coating with a spatula or a brush for metal.
If you want to save time, effort on the preparatory work, buy special tools for quickly removing wallpaper and paint from the walls – Quelyd, Metylan, “Prospector” are popular. Features of their use are indicated on the packaging..
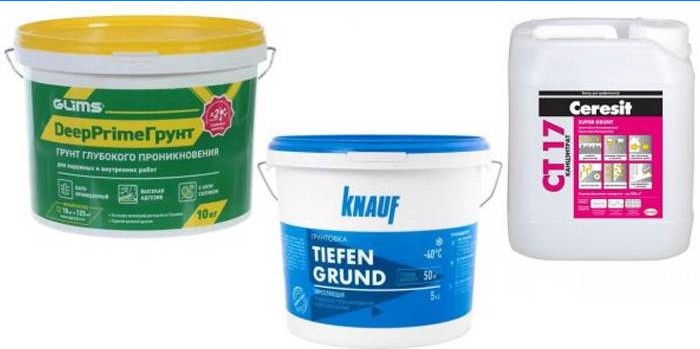
Primer and putty of walls
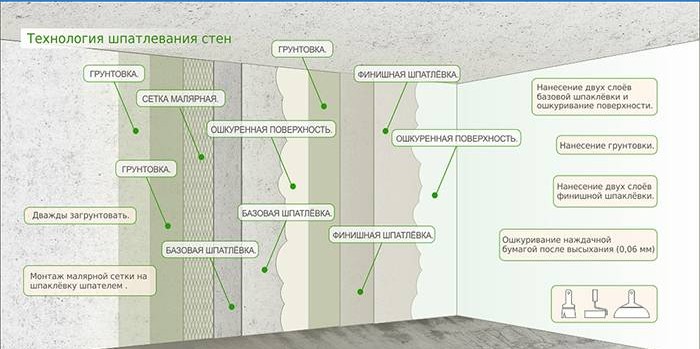
- Significant defects are leveled using plaster, a chisel or a perforator.
- Small pits, scratches, cracks close up with gypsum or acrylic putty.
- The surface is carefully sanded, cleaned of dirt, dust with a broom, a brush or a rag.
- To keep the canvas well, the surfaces are covered with an acrylic primer or wallpaper glue. The second way is cheaper. Recipes of the compositions: 10 l of water and 300 g of wallpaper glue or 2 tbsp. construction PVA. Such soil is applied with a roller, brush or brush, and it dries for 5-20 hours. Perform the procedure immediately before gluing the wallpaper so that dust does not settle on the walls.
Tools and materials
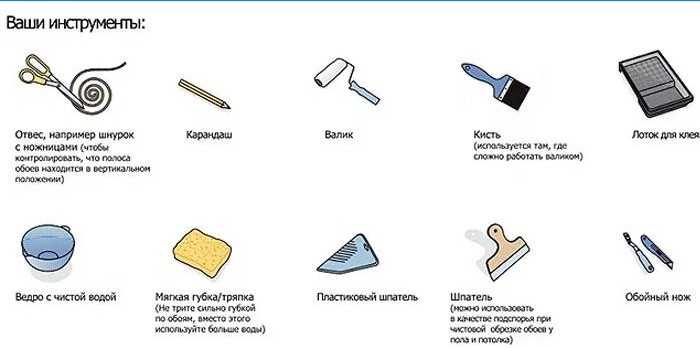
- Cutter knife.
- Chalk Extraction Cord.
- Plumb.
- Wallpaper brush.
- Roulette.
- Wallpaper scissors.
- Joint Roller.
- Wallpaper glue brush.
Wallpaper selection
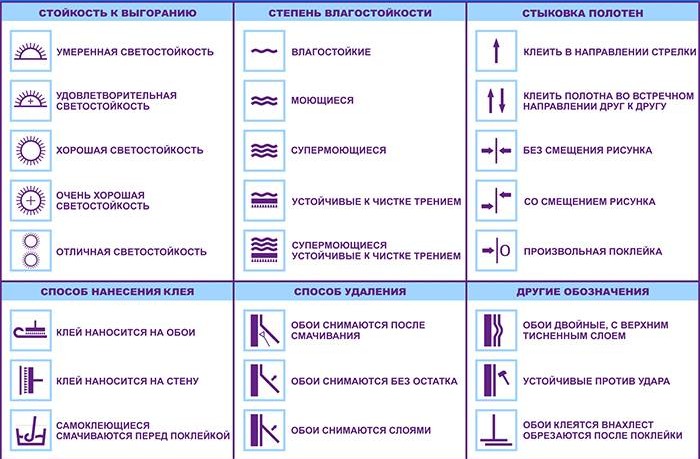
Key product parameters:
- Environmental friendliness. It is advisable that the wallpaper be made of safe materials..
- Moisture resistance. The overall service life of the material depends on this criterion. A high level of moisture resistance is especially important when buying wallpaper for the kitchen, bathroom.
- Breathability. The larger this parameter, the better the walls will “breathe”. So under the canvases moisture does not accumulate and mold does not form.
- Care Features. Paper wallpapers cannot be washed, but can be vacuumed, wiped with a dry cloth, non-woven – they are cleaned with a damp cloth, special detergents are used for vinyl.
Characteristics of the types of wallpaper:
- Paper. Classic canvases. Types: simplex – with one thin layer, duplex – of two layers, one of which makes the material more dense, lightfast. Advantages of paper paintings – they are affordable, environmentally friendly, breathable, presented in different colors. Cons – low moisture resistance.
- Non-woven. Most Popular. They are hypoallergenic, breathable, easy to care for, wear resistant and easy to glue..
- Vinyl. These canvases consist of non-woven, polyvinyl chloride. The surface of the wallpaper can be rough, silkscreen (depending on the light, slightly changes the initial shade) and glossy. The main advantages of the material – it is wear-resistant, moisture-resistant, unpretentious in care. Cons – difficulty sticking, low breathability
How to calculate the right amount
According to the old wallpaper (if they match the width of the new):
- Measure the height of the wall.
- Count the number of stripes of old wallpaper in the room.
- Divide the length of the roll of new paintings by the height of the wall to determine how many will fit into it.
- The number of strips of old wallpaper divided by the number of paintings in a roll.
Calculation example (wall height – 2.4 m, roll length – 10 m, number of old strips – 25 pcs.):
- 10: 2,4 = 4 (number of paintings per roll).
- 25: 4 = 6.25 (or 7 rolls).
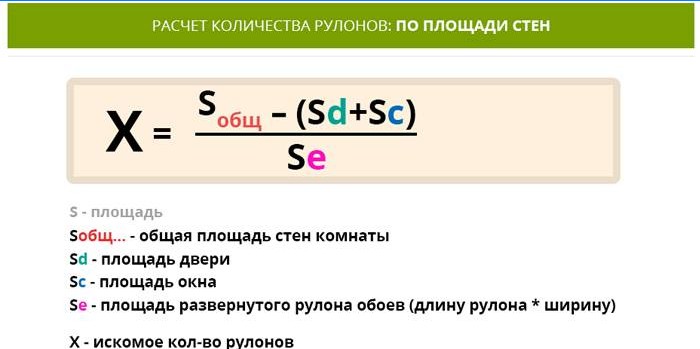
Calculation “from scratch” (without old wallpaper):
- Multiply the length and width of the wall, get its area (S).
- If there are window, doorways, calculate and subtract them S from the total area of the wall.
- When planning a decor that doesn’t need wallpaper, measure its S and subtract from the total wall area.
- Summarize all the results, get S wallpapers.
- Divide the room area by S roll to find out how many will be needed..
Calculation of wallpaper with a picture:
- Measure the height of the wall.
- Divide the value by the step of the ornament (often it is 52-53 cm).
- Round the result up, you get the value of rapport (repeating elements of the picture).
- Multiply the result by the step of the ornament. As a result, you will find the desired length (L) of the canvas, which will be cut off from the roll.
- To determine how much waste remains, subtract the height of the wall from the resulting L.
- Divide the roll length by L of one web.
- Divide the final number by the result from the fifth paragraph.
- Subtract the resulting coefficient from the length of the roll.
- Divide the total area of the room by the final value in paragraph 8. So you get the number of rolls that will be needed for repair.
Example parameters:
- Wallpaper roll length – 10 m.
- Ornament pitch – 0.52 mm.
- Wall height – 2.4 m.
- Room size – 40 square meters. m.
Calculation example:
- 2.4 m.
- 2.4: 0.52 = 4.61
- Round to 5.
- 5 x 0.52 = 2.6.
- 2.6 – 2.4 = 0.2 mm (or 20 cm)
- 10: 2.6 = 3.84.
- 3.84 x 0.2 = 0.768.
- 10 – 0.768 = 9.23 m.
- 40: 9.23 = 4.33 (or 5 rolls).
Methods of cutting cloths
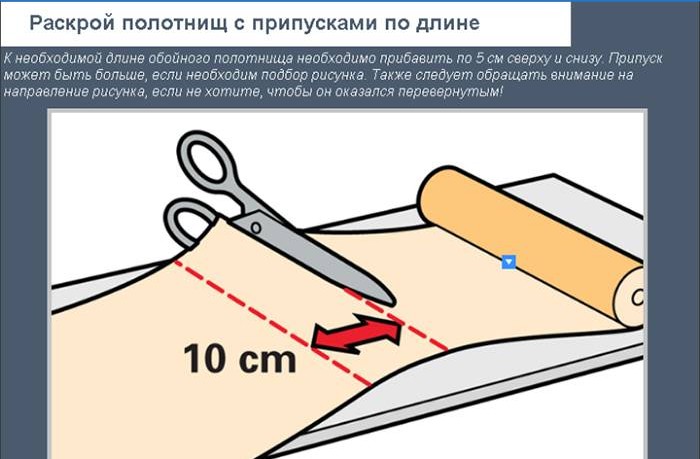
Wallpaper without a picture:
- Measure the height of the wall with a tape measure.
- Roll the wallpaper on the floor, measure and cut the required amount of canvas. To make the strip as smooth as possible, fold the wallpaper in half and cut parallel to the fold.
- If the walls are crooked, measure the length of each canvas.
Wallpaper with a picture:
- To reduce material consumption, after measuring the height of the wall, cut one strip, lay it face up.
- Roll the second roll and attach to it so that the pattern matches.
- Fix the junction with a heavy object, cut the second strip.
Where to start
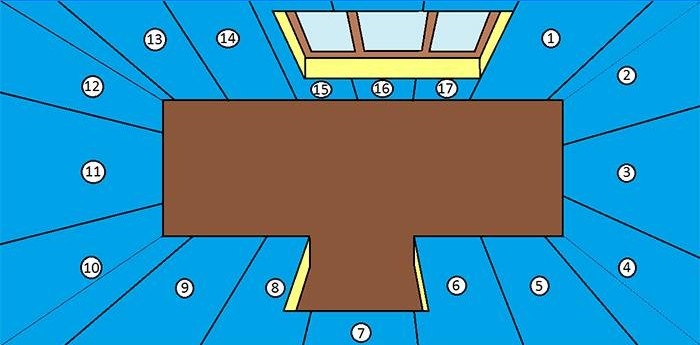
- Glue the wallpaper from the corner near the window or doorway. Often in such places the walls are the most even, so it is better to start work with them. In light falling from the side of the window, the joints of the paintings will be less visible.
- If you are a layman or are going to use wallpaper with a picture, start gluing it from an inconspicuous place – for example, where the cabinet will stand. Often the first and last stripes do not coincide in the figure, the junction is noticeable, unaesthetic. Following this recommendation, you can cover the defect.
Proper Wallpapering
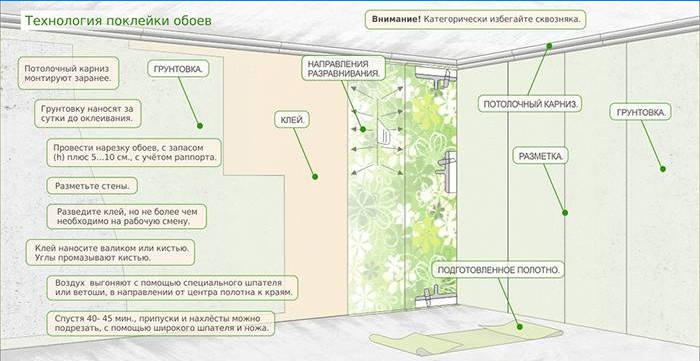
To the canvas subsequently did not lag behind the walls, first close all windows, doors. Surfaces should not be cold, so work better in the warmer months, not in the winter. For better impregnation of cloths with glue, fold the ends of the strip to the center with the composition inward, without pressing the bends. Do not overdo the wallpaper in such a condition that they do not stick together.
Choose environmentally friendly glue for your home.
It should contain substances that prevent the formation of fungus. Please note that the packaging contains tips for diluting the composition. Apply it to wallpaper or walls – the method depends on the type of paintings (paper, vinyl or non-woven). The manufacturer must indicate the time of impregnation of the material with glue.
Paper
- Apply glue to the canvas, fold it with the wrong side inward for 5-7 minutes. In advance, specify the exposure time of the composition so that it does not dry out, and the wallpaper does not stick together.
- If the material is heavy, apply glue to the canvas and wall, carefully lubricating corners, places near the ceiling, floor.
- Attach the prepared material to the very top of the wall, making wallpaper overlap on the ceiling of 50 mm.
- To make paper wallpapers stick without bubbles, smooth the material from the center up, then down with light movements. Do this first with your hands, then with a wide silicone spatula, a dry cloth or a paint roller.
- Protrude excess material protruding from above and below with a wallpaper or clerical knife.
- Glue the remaining strips in the same way..
- The drying time of the material is 24-72 hours.
Non-woven
- Use a special adhesive for the canvas.
- Apply it to the material and dry wall or only to the surface.
- Non-woven wallpaper is durable, does not stretch, so working with them is very convenient. Thanks to these qualities, possible defects can be easily and quickly fixed..
- The material dries in about a day – the denser it is, the longer it will take.
Vinyl
- Coat the wallpaper with special glue. Dilute and apply according to the instructions on the packaging..
- They are very dense, so you need to glue the wallpaper in a joint.
- When smoothing the stripes, do not press the silicone spatula too hard so as not to tear or scratch the decorative layer.
- The walls should be well dried.
- During operation, do not allow drafts, close doors, windows tightly.
- The humidity level in the room should not be more than 60%.
- The vinyl material dries in about two days.
Ceiling
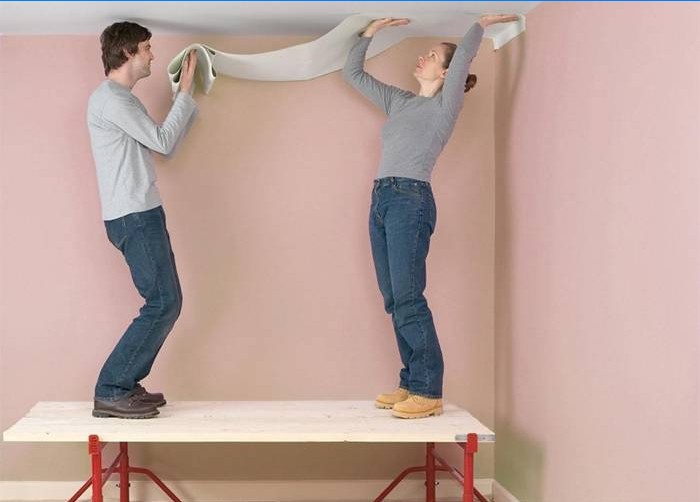
- It is better to glue the wallpaper together.
- In the process, move along the length of the room, perpendicular to the window, in the direction of the incident light.
- Cut strips of the required length, adding 15-20 mm on each side.
- Apply glue to the material (if the canvas is non-woven, the solution can only cover the wall), let it soak for 5-7 minutes. At this time, fold the band with an accordion with a width of folds of 300 m, without pressing them.
- Attach the beginning of the canvas to the starting line, the assistant should hold the rest of the material. Gradually smooth the wallpaper with a dry cloth, moving from the beginning of the strip to the end.
Photowall-paper
- Do not use self-adhesive murals if you are a beginner. At the slightest error, all work will be ruined.
- Wall murals have a thin base, so thoroughly clean and level the wall.
- Make markup in advance where the composition will be located.
- Carefully join the canvas between each other, there should not be any shifts between the fragments. Joints are well lubricated with adhesive. Roll the seam with a special rubber roller. Remove glue residues with a dry cloth later..
How to glue wallpaper in the corners
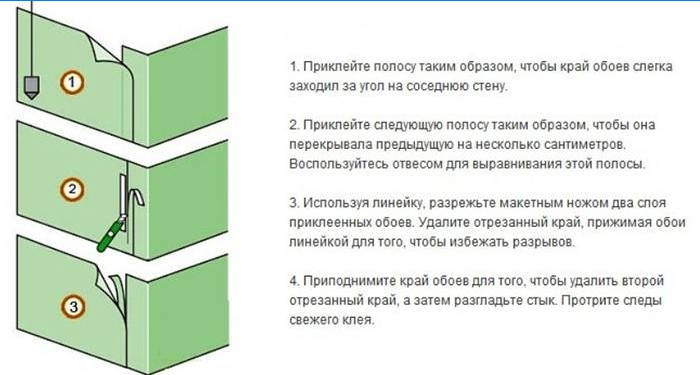
Internal:
- Cut two strips of desired length and width.
- Glue the first canvas, turning around the corner by 1-2 cm.
- The second lane – starting from the corner, with an overlap.
- To the seam was not visible, press the spatula to the corner, draw a line with an office knife. Remove the cut strip. Align the seam and wallpaper with a spatula, then with a dry cloth so that there are no “bubbles”.
External:
- Cut two strips of desired length and width.
- Get the first canvas around an angle of 1-2 cm, glue.
- Attach the second strip with an overlap, leading around an angle of 1-2 cm.
- Attach a ruler to the corner and cut off the uneven edge of the blade with a knife.
Around doors, windows and behind radiators
Near the openings:
- Cut the canvas from the roll so that it goes beyond the opening by 1-3 cm.
- Glue the strip, cut off the excess first with scissors, then with a clerical knife.
- In the corners make an incision of 45 °, wrap the excess cloth along the opening and cut.
- Press the strip to the surface using a dry cloth..
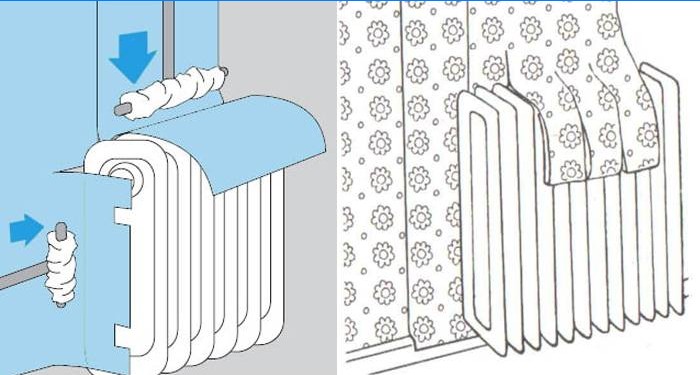
Behind the radiators:
- Measure, cut the right amount of material.
- Make cuts at the radiator mounts.
- Apply glue with a thick layer on the canvas, wrap the wallpaper behind the battery and smooth it with a dry cloth.
How to fix errors
Common defects:
- Skewed stripes and pattern mismatch.
- Bloating or peeling.
- Noticeable seams and crevices on them.
- Paper tears in the corners.
Pattern mismatch
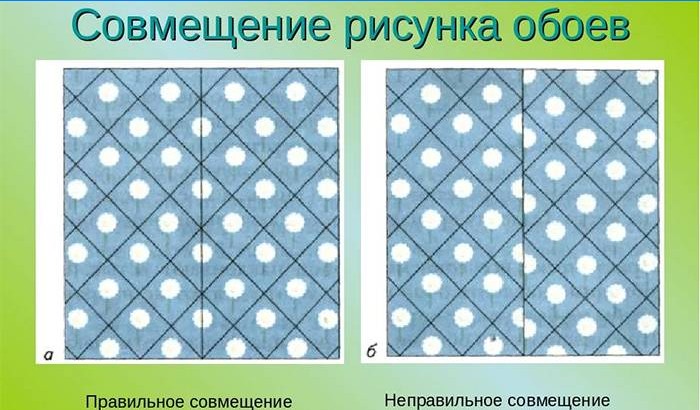
To avoid distortions, match the ornament before cutting the canvas. Glue one strip, straighten the roll next to match the pattern. Make notes, cut wallpaper on them. Continue gluing the canvas according to the specified pattern.
If you see a pattern mismatch, immediately unfasten the canvas from the wall, straighten the roll again, match the ornament and cut a new strip.
Bubbles and creases on the wallpaper
Causes of defects:
- Incorrect bonding. Bubbles, bulges are formed due to air entering the wallpaper. To avoid this, attach the canvas to the wall, smooth it well with a dry soft cloth. Run rags from the center to the edges of the strip. A small bubble can be removed by introducing glue under the wallpaper with a syringe. After that, carefully smooth out the problem area with a dry cloth.
- Low room temperature, cold glue, drafts. You need to work at 15-25 ° C, with the windows closed, the door. Glue temperature should be 30-35 ° C. In the heat, pre-moisten the room – place water containers in different places. At the end of the repair, do not ventilate the room for several days..
- Failure to comply with the instructions for cooking, applying glue. Before work, carefully study the features of the use of the compounds indicated on the package. Glues of animal origin must not be overheated, otherwise they lose their properties. For different types of wallpaper designed their own types of compositions. Application rules may vary..
Peeling
This is due to non-compliance with the temperature regime and the rules for cooking, applying glue. Often the wallpaper moves away from the walls due to the fact that the surface was not prepared, it remained dust, bumps, old finish.
Clean the walls of the previous coating in advance, repair cracks, scratches and depressions. Before the sticking, apply an acrylic primer.
Gaps in the corners

The cause of the defect is the use of one canvas. To keep the wallpaper from tearing, take two stripes – first glue it, leading around the corner by 2-3 cm, and the second overlap, laying on a three-centimeter section. You can use this scheme: in the inner corners, bring one canvas 2 cm around the corner, swipe the corner with a clerical knife, remove excess wallpaper. Glue the second strip as well.
Joints
In no case do not correct the resulting distortions by pulling the strips – this can lead to rupture of the material. It is better to remove one or more canvases and glue again. To avoid distortions will help vertical or plumb. Fasten the thread with the weight in the upper part of the wall, near the ceiling itself, and glue the canvas along the line that it forms.
I’m interested in trying my hand at wallpapering, but I need some guidance. Can anyone share some tips or step-by-step instructions on how to glue wallpaper yourself? I’d greatly appreciate any advice or resources that could help me achieve a professional-looking result. Thanks in advance!