Recommendation points
- Chimney type and heat transfer
- Making an opening in the ceiling
- Roof passage
- Chimney thermal insulation and passage assembly
- Varieties of roof cuts, restoration of waterproofing
The chimney device cannot be attributed to the typical operations of the construction of a private house. There are different types of floors, roofing pies and coverings, which complicates the work under a single instruction. We propose to go over the main stages and find out how to make chimney cutting safe and aesthetic.
Chimney type and heat transfer
The chimney can be made with masonry, ordinary steel or insulated sandwich pipes. In each case, an individual approach is needed, because in fact, there is a different intensity of heating, and the method of fixing the cutting of the floor and roof.
Chimneys made of bricks turn out to be the most practical and simple to arrange. The high heat capacity of the masonry does not allow the temperature on the outer surface to rise to fire hazard values. In addition, parts of the grooves and protective covers can be easily and securely attached to the brick chimney. Well, the fastening of the waterproofing roof apron is carried out according to the simplest scheme without the use of “branded” fittings.
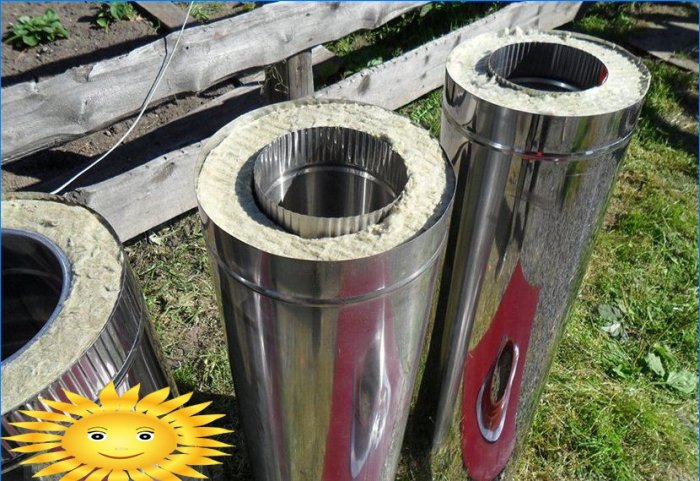
Insulated composite pipes are used just as widely, but in some aspects they are inferior to brick ones. They do not look so natural and can hardly withstand any additional load. Even more: chimneys of complex shape and long length require additional fastening, which does not benefit aesthetics. The heat transfer from such pipes is greater than from brick ones, despite the presence of insulation, they are able to heat the surrounding space quite strongly and require additional lining.
Finally, non-insulated pipes are often used – asbestos-cement, or even steel. The passage of such a chimney through the ceiling and roof is carried out according to the most complex scheme. The cover must not only insulate heat, it must be heat-resistant. In addition to incombustibility, it is required to maintain integrity and mechanical strength during cyclic heating / cooling.
Making an opening in the ceiling
In addition to the difficulties associated with different types of chimneys, there is a certain amount of uncertainty due to the variety of floors. The easiest way is with concrete monolithic ceilings: an angle grinder with a disc for cutting concrete is cut out in them, adhering to the minimum permissible indents from the chimney pipe. Since the floor material is non-flammable, a minimum of thermal insulation is required..
It is more difficult with structural strength, especially when passing prefabricated floors or if the width of the chimney is 2–3 times greater than the slab reinforcement step. It is advisable to provide for the need for an opening even at the stage of installation of the floor, by erecting a reinforced steel hoop or by filling the end of the opening with the inclusion of additional reinforcement.
The opening in the frame ceiling is more difficult to arrange. First you need to determine the location of the supporting beams. Roughly in the center of the opening, you need to make a hole with a wide crown, to feel the removal of the beams and their direction by touch. Outside, we apply the markings within the free space, then cut out a section of the floor and the rough ceiling with a jigsaw or a manual circular. Most likely, the beams will not immediately cut the full profile, but now they will become available for further manipulations..
You can cut out fragments of beams with an ordinary hand hacksaw and then finish trimming parts of the floor and ceiling. To restore the strength of the ceiling support system, it is enough to add a pair of crossbars, which are equivalent in power to the total cross-section of the removed parts. Allowance for the thickness of the inserts must be made in advance. In the cavity at the open ends, you need to lay insulation and sheathe the opening with a thin board or sheet materials. For greater reliability, you can repeat the cladding with materials with low thermal conductivity – heat-resistant gypsum board or MGL.
We will describe the filling of the passageway with a heat insulator and the restoration of the cladding a little later. Now it is worth noting that due to thermal linear expansion, the chimney and its lining must be located independently of each other with a small gap, otherwise the formation of cracks can spread far beyond the junction area. The inner surfaces of openings in ceilings made of conditionally combustible materials should be treated with fire retardants, as well as the area of the ceiling and floor 50-60 cm from the passage.
Roof passage
When passing both through the ceiling and through the roof, the main rule applies – do not join the pipes in the plane of their section. In addition, it is better to join the segments under the roof than above it, even if this requires the purchase of additional molded pipes.
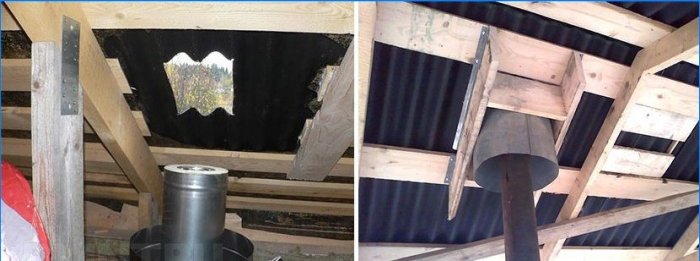
An opening in the roof is made from the inside. If there is a sheathing and insulation, they are dismantled and the section of the chimney is transferred using a plumb line, marking an ellipse on the crate. Along its contour, you need to drill several holes in places from which it is convenient to start cutting with a jigsaw, while sawing both the roof covering and the crate under it.
When the hole is made, it is necessary to disassemble the cover 30–40 cm away from it. Next, you need to expand the opening in the crate to the thickness of the insulation. The easiest way to equip a cavity for filling with insulation is to tie the rafter legs with jumpers, forming a rectangular pocket.
Chimney thermal insulation and passage assembly
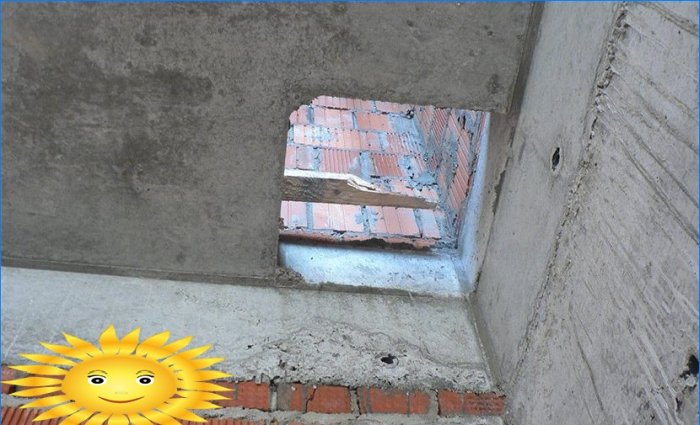
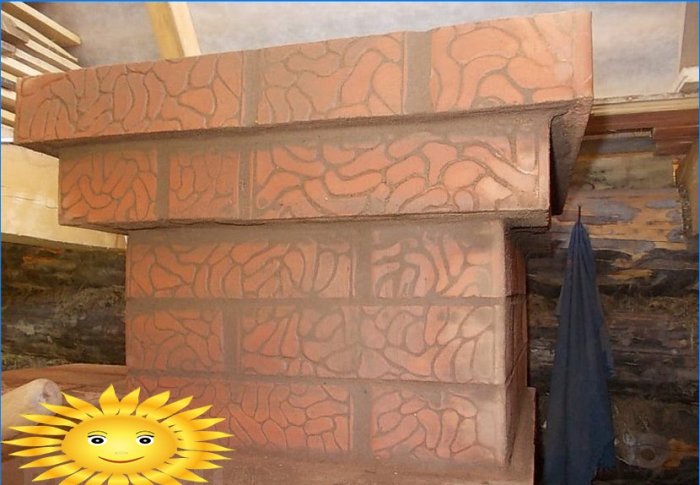
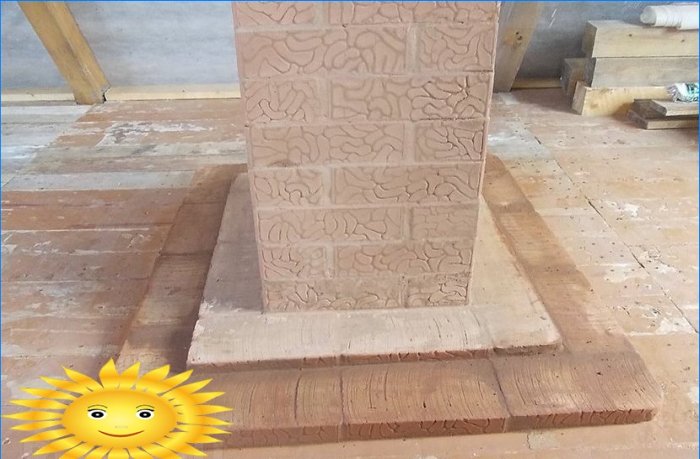
Chimneys made of brickwork do not require thermal insulation as such. Instead, fluffing is performed – the expansion of the channel at the place of its passage through the ceiling. It is not difficult to lay out the fluff: it starts 3-4 rows below the ceiling. Each subsequent row of expansion is laid out, starting with the outer bricks, which are released beyond the chimney profile by half their width. The cavity formed inside is lined with bricks placed on the edge.
It is worth warning that when laying a brick chimney, you need to give time for shrinkage, collecting no more than 10-12 rows in one day. This is especially true of channels called mounted, that is, laid out on top of the stove or fireplace, and not next to them. If the dimensions of the opening were chosen correctly, after laying the fluff, there should be a gap of about 15–20 mm between it and the casing.
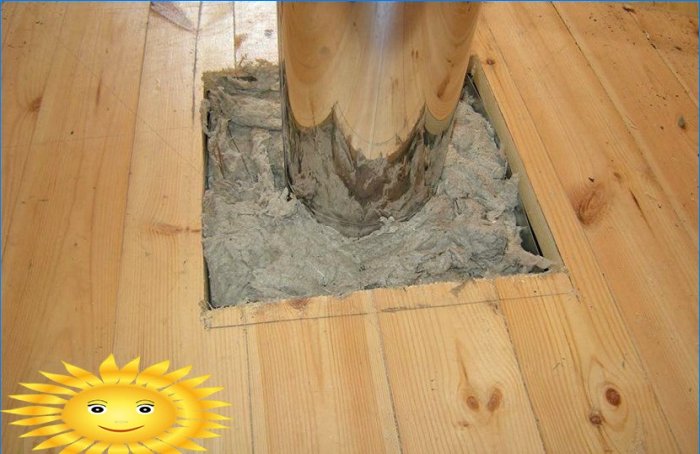
The insulation of the passage of composite and simple pipes is arranged in a completely different way. Basalt wool is used as a filler for the opening; this is true for the passage both through the roof and through the ceiling. The thickness of the thermal protection fence is always selected individually, on average it is 200-250 mm for composite pipes and about 400 mm for uninsulated pipes.
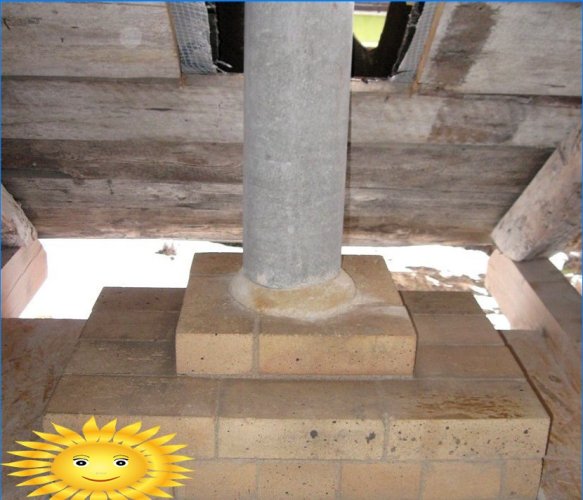
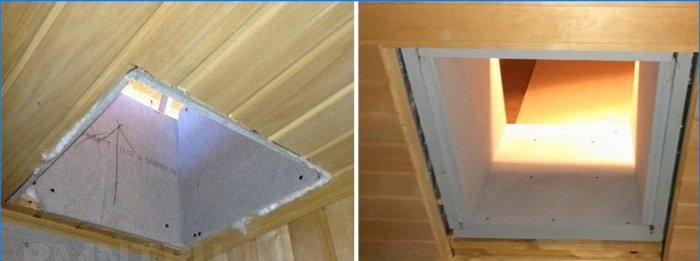
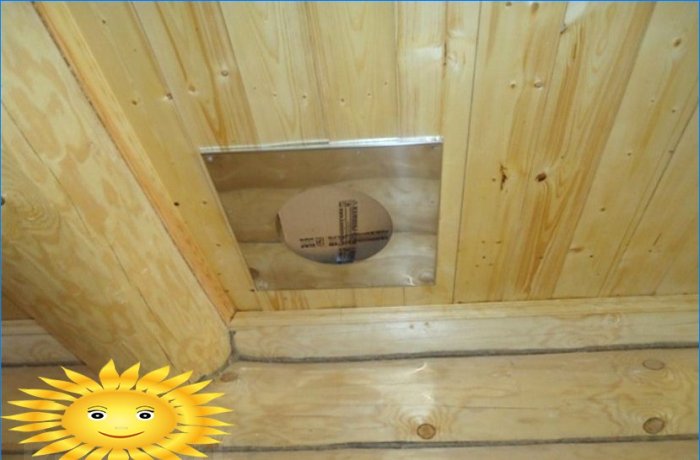
For the convenience of laying the filler, the opening is hemmed from below with sheet heat-resistant material – magnesite or asbestos-cement slab, sheet steel or roofing sheet. A hole must first be made in the patch, with a section of 10-15 mm larger than the channel on each side.
A similar operation is performed in the roof passage. With the only exception that the surface is inclined and the hole for the channel must be oval. If the chimney is made with an uninsulated pipe, divide the opening space with a casing sleeve. Inside it, the space is filled with dense heat-resistant material, for example, a soaked asbestos briquette with the addition of cement and bonding fiber.
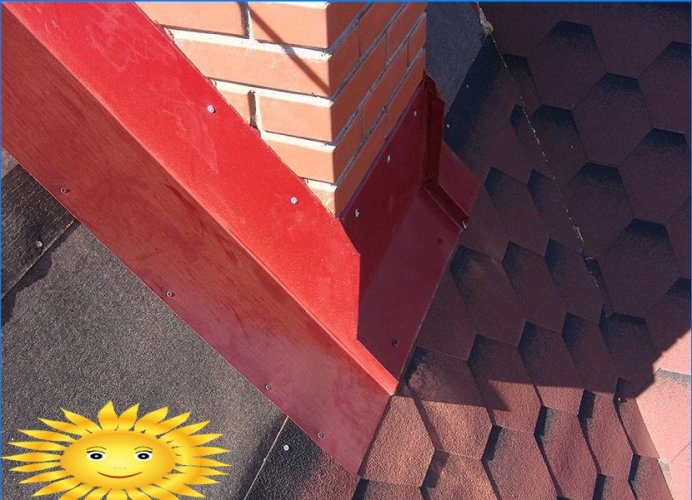
Varieties of roof cuts, restoration of waterproofing
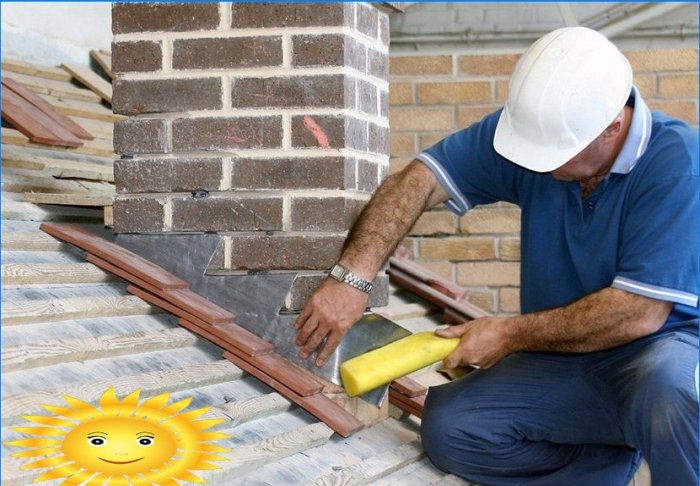
If it is quite simple to restore the floor of the ceiling, then the covering of the passage through the roof should completely exclude water leakage. To insulate brick chimneys of rectangular cross-section, a cut is made around the ring with a depth of about 30-50 mm. From thin sheet metal, you need to bend four Z-shaped profiles. With the upper shelf, they are inserted into the groove, with the lower one adjacent to the roof covering. In addition to the external apron, an internal one is also arranged, which does not cut into the body of the chimney and is mated with the roofing waterproofing.
The inner apron is made with an L-shaped (ridge) profile with a shelf width of 150 mm. Installation begins from the highest point: the ridge is nailed to the chimney with dowels, waterproofing is applied on top and fixed with glue. On the sides, you need to leave outlets of about 200 mm, which are cut along the fold line and wrapped on the sides of the chimney.
Before the final fixing of the petals, the side parts of the apron are mounted, and before they are fixed, the lower segment of the trim. It is important to fill in the waterproofing correctly: along the fold line of the lower part of the apron, it is released over the metal ridge. Next, the roofing is restored and the upper cover is mounted – the ligation scheme with the coating is the same as in the previous stage. It is recommended to coat the junction of both covers with mastic or plastic sealant, completely excluding the penetration of moisture.
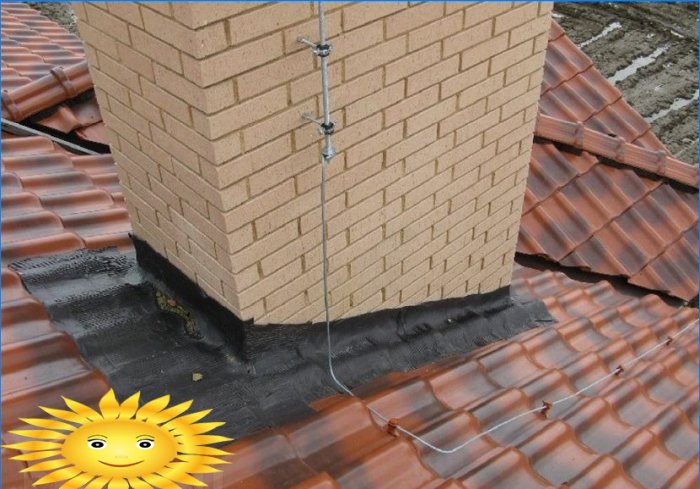
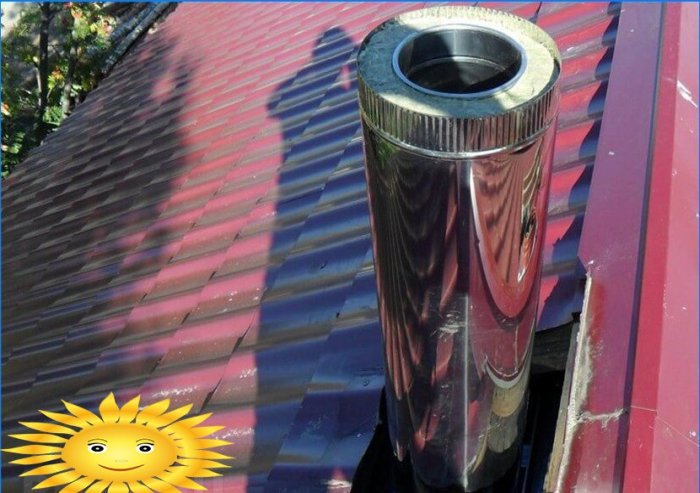
If the brick chimney is arranged strictly vertically, in the case of pipes, it is recommended to move the passage as high as possible to the ridge of the roof. In this case, it is enough to start a wide metal pad under the ridge, and then isolate the connection to the pipe with an elastic cuff. Otherwise, you cannot do without purchasing a special set of roof cutting, but on the other hand, the likelihood of a leak will be guaranteed to be eliminated. Each type of roofing has its own set of cutting, repeating the shape of the surface and sealed with a pipe or a sealant or a heat-shrinkable neck.


I’m not an expert in construction, but I’m curious about the correct method for installing a chimney passage through both the ceiling and roof. What are the key considerations and necessary steps to ensure a safe and proper installation? Are there any specific building codes or regulations that need to be followed for this particular task? Any advice or insights would be greatly appreciated!
When installing a chimney passage through both the ceiling and roof, there are several key considerations to keep in mind to ensure a safe and proper installation. Firstly, it’s important to determine the proper size and type of chimney for your specific heating appliance. The chimney must be securely anchored and insulated correctly to prevent heat transfer to combustible materials.
Additionally, the chimney must have proper clearance from any combustible materials, both inside the home and outside. It’s also crucial to follow any manufacturer’s guidelines for installation, as well as local building codes and regulations. This may include requirements for chimney height, materials used, and clearances from the roofline.
It’s recommended to hire a professional contractor experienced in chimney installations to ensure that the job is done correctly and safely. By following these guidelines and consulting with local authorities, you can ensure a safe and proper chimney installation that complies with all necessary regulations.
I would like to ask for guidance on the correct procedure for installing a chimney passage through both the ceiling and roof. Are there any essential steps or precautions one should consider to ensure a safe and effective installation? Any advice or recommended resources would be greatly appreciated.
When installing a chimney passage through both the ceiling and roof, it is crucial to follow proper procedures to ensure safety and efficiency. Here are a few essential steps to consider:
1. Planning: Determine the best location for the chimney passage, considering factors like structural support, fire safety, and compliance with building codes.
2. Measurements: Accurately measure the required diameter for the chimney and ensure it is in line with the specifications of the fireplace or heating system being used.
3. Cutting: Cut the hole for the chimney in both the ceiling and roof carefully, following the guidelines provided by the manufacturer. Use appropriate tools to prevent damage to surrounding areas.
4. Insulation: Install insulation around the chimney passage to prevent heat transfer and protect against fire hazards. This step is crucial for maintaining safety standards.
5. Weatherproofing: Apply suitable weatherproofing materials, such as flashing or sealants, around the chimney passage to prevent water leaks and potential damage to the roof.
6. Installation of Chimney Components: Assemble and install the chimney components according to the manufacturer’s instructions. This may include the chimney liner, cap, support brackets, and other necessary parts.
7. Professional Help: It is advisable to seek the assistance of a licensed professional chimney installer, especially if you lack experience or expertise in this area.
Ensure you consult local building codes and regulations, as they may have specific requirements for chimney installations. Recommended resources include manufacturer instructions, professional chimney installation guides, or consulting with a licensed contractor. Prioritizing safety and adhering to the correct procedures will help ensure a successful chimney installation.
Can you provide step-by-step instructions or tips on how to properly and safely pass a chimney through both the ceiling and roof?
Can someone please explain the correct process of installing a chimney that goes through both the ceiling and roof? I want to make sure I do it correctly and safely. Any tips or guidelines would be greatly appreciated!
Can anyone provide guidance on how to properly install a chimney through the ceiling and roof? I’m looking for step-by-step instructions or any tips and precautions to ensure a safe and effective installation. Thank you!