Recommendation points
- What is the difference between bending round and shaped pipes
- Do-it-yourself profile pipe bender on rollers
- Small Radius Hydraulic Profile Bender
- Frame making
- Assembling the machine
- Special elements
- Simplified machine options
From this article you will learn how to assemble a pipe bending machine on your own. Also in the article you will find information on how to make a pipe bender with your own hands, videos and drawings with comments on the assembly and use of the machine. We will tell you about the nuances of editing and share the secrets.
Pipe bending machines are essential not only for professional but also for homework. Bends of pipes along a large radius are especially relevant – they are used to make the edges of the frames of greenhouses, canopies, greenhouses. We will tell you how to make simple pipe bending machines in this article..
What is the difference between bending round and shaped pipes
Pipes of straight and round cross-section initially have different purposes – round for water supply (sometimes pillars), straight for the frame. Therefore, the requirements for the tightness and safety of the wall are different for them – a round pipe should preserve its properties as much as possible. In this regard, thrust wheels and mandrels always have a groove for a certain diameter. The wheels and headstock for the profile pipe have either a rectangular groove, or generally a “tooth” along the entire circumference. It pushes the pipe wall inward and thereby maintains the cross-sectional dimensions. This is relevant because a straight profile is bent under a small radius, mainly in order to obtain decorative elements of the so-called “cold forging”.
Do-it-yourself profile pipe bender on rollers
Homemade version of this machine is schematically taken from factory models. The design is maximally simplified and within the power of a novice master. According to the principle of operation, roller machines are divided into two main types – with press rollers and with a lifting platform (platforms). At the same time, the basic structure practically coincides, the only difference is which element will set the radius of the arch. We will look at a simple design with a lifting platform..
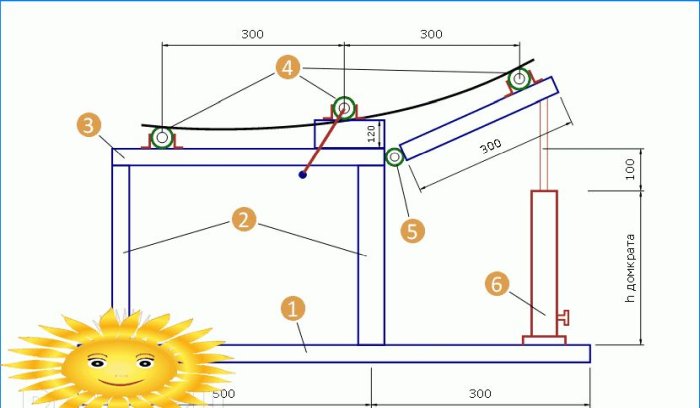 1, 3 – channel; 2 – racks; 4 – rollers; 5 – loop; 6 – jack
To create the machine, you will need three pairs of bearings with a landing diameter of at least 30 mm – this will be the base of the rollers. Also, the shafts themselves should be matched to them so that they sit in the bearings (scrap, circle, factory shafts, auto parts). The rest of the material – channel, steel plate 10 mm, angle – can be varied depending on the available stock.
Completing of the work:
- Take a reliable base, for example, a thick-walled channel 100-150 mm, 800 mm long.
- Platforms need to be made from the same channel – two sections of 300 mm each.
- At 500 mm from one of the sides, we vertically weld a central post 350 mm high from a square pipe or twin channel.
- From above, strictly horizontally weld on a fixed platform and a rear rack to it.
- We build up the walls from the profile pipe to a height of 120 mm. The height must be maintained in such a way that the dimension in the drawing is not less than the maximum thickness of the pipe to be bent.
- To create a movable platform, you need to make a loop. We select the pipe and the “finger” to enter it without backlash. We cut the pipe to the width of the channel and divide it into three parts. We weld the two extreme ones to the bed, and the third (middle) to a section of a channel of 300 mm. We mount the connection “on the finger”.
- We weld bearings on both sides to both parts of the platform 50 mm from the edge, as well as on the extended walls. Strengthen with corners.
Attention! Pay attention to the alignment of the bearings – misalignment will prevent the shaft from being installed.
- We install the rollers in the bearings. On the middle drum we mount a removable crank, for example, a bicycle pedal.
- At the end of the movable platform, you need to start the regulating mechanism. Ideally – a hydraulic jack, but you can do with a threaded jack (pull from the machine, leg from the scaffolding). The lift is also bolted to the base..
- On request, feet can be welded to the base for mounting on bolts.
Home pipe bender, video
Small Radius Hydraulic Profile Bender
The three-point machine differs from other types of pipe benders not so much in the drive (hydraulics), but in the way of applying force. The principle of operation of this device is extremely simple – a pipe section, fixed by an emphasis at two points, is pushed in the middle (at the third point) by a radial mandrel with a groove, gradually taking its shape.
This pipe bender is convenient because it can be assembled on a movable platform with wheels for transportation. The platform will be needed in any case, since the force applied to the mandrel will need to be compensated by the stop. The pressure of such a force can be exerted by a mechanical (threaded) or hydraulic jack.
To make a pipe bender, you will need material:
- Steel plates 10 mm with dimensions 600×150 mm – 2 pieces, 300×80 – 1 piece.
- Strip or cut from a 6-10 mm plate, 450 mm long – 4 pcs.
- Bolts with nuts Ø 10 mm and 20 mm.
- Tensile springs 200 mm.
Tool:
- Welding and locksmith – powerful grinder, welding machine, drill from 850 W (machine).
- Measuring and marking – tape measure, squares, marker, center punch.
- Consumables – cutting and grinding discs for metal, metal drills 6, 10 and 16 mm.
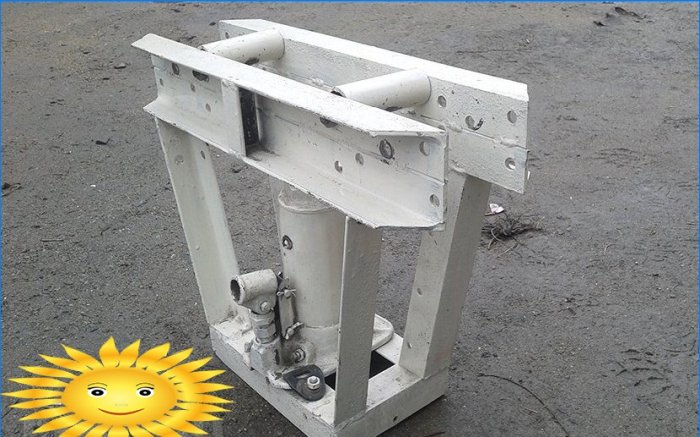
The machine will consist of a spatially rigid frame and a removable car jack. The main advantage of the collapsible machine is the ability to use the jack separately – you do not need to purchase it specifically for the pipe bender. In principle, the power drive can be at least a diesel internal combustion engine. Its main task is to give out enough force to overcome the pipe resistance..
Frame making
The frame consists of two mirror elements – frame walls – and a heel on which the jack will be installed. Structural elements are arranged according to the drawing.
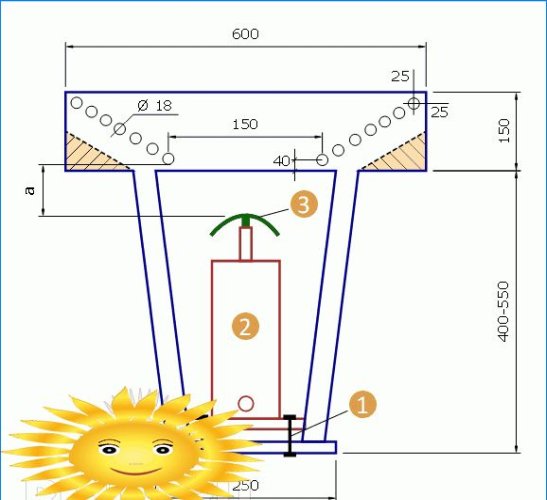 1 – bolts; 2 – jack; 3 – mandrel
The build plate is marked from the vertical axis (if the frame is vertical). The first lower holes are located 40 mm from the edge and 75 mm from the axis. The axes of the outer holes are 25 mm from the outer edge. Having marked out the first and the outermost wing holes in this way, you can build the axis of the intermediate holes, then divide it into equal segments. The intersections of the marks and the inclined axis will be the axes of the holes.
It is better to drill holes Ø 22 mm in several passes, gradually increasing the diameter (for example, O 6, O 10, O 18, O 22). This is especially true if you do not have a drilling machine at your disposal, but only a drill..
Attention! Remember that the larger the diameter, the lower the rotational speed of the drill and the stronger the pressure.
The mirror plate is made in the same way. The lower thrust plate should be marked evenly along the axes and the locations of the mounting holes for the jack should be identified. The heel of the jack always has standard mounting holes.
The height of the structure is determined by the dimensions of the existing jack and the distance from the bottom of the mandrel chute to the contact surface of the thrust roller (headstock) strictly vertically (dimension a in the drawing). Distance a should be approximately 20 mm with the jack rod fully retracted (no load). This is necessary to install a pipe of minimum diameter (15-16 mm).
The free corners (shaded in yellow) can be cut off. All edges and ends should be sanded with a grinder, preferably then go through the “petal” disc.
Assembling the machine
The distance between the mirror plates should be several millimeters larger than the maximum diameter of the pipe to be bent. For this type of machine, the optimum maximum is 50 mm. Total between the plates is 53–55 mm. The thrust rollers must be exactly the same size (cylinder height) and must be installed first before welding. Having determined the location of the steel strips on the heel, we weld the structure together.
Then, in the lower third, we determine the optimal position of the intermediate shelf and attach the return spring to it. The fastening of the spring to the jack rod is selected individually, based on the design of the jack and improvised means.
Special elements
There is one caveat in a three-point pipe bender – one part cannot be made at home and you will have to contact a turner or buy. This is a mandrel. Manufacturing of one mandrel costs from 10 to 25 USD. e. depending on the size and complexity. The price of mandrels in the store is from $ 20. e.
The thrust rollers are also worthy of special mention. They can be a powerful steel bushing for a 20 mm axle (bolt). On the outer plane, you can weld on homemade mandrels for the main diameters – 25, 32, 38 and 50 mm or profiles. A thrust roller mandrel can be made by cutting it out of a larger pipe and trimmed with a hammer.
Simplified machine options
For a large amount of work with thin (16-25 mm) pipes, as well as thin-walled (copper, aluminum, stainless steel), you can assemble a simple version of the described machine literally from several strips of metal. Such a machine will be many times lighter, but the range of workpiece diameters is limited. The main difference is that the holes are located in a row perpendicular to the jack rod.
If a hydraulic jack is not available, you can replace it with a threaded jack by mounting it in place in the frame stop. To do this, you need to burn a hole in it and weld a nut under the threaded rod, similar to how a pipe bender was made, the video of which is located below.
Manual three-point pipe bender with a threaded jack on video
The convenience of the design lies in the fact that it can be completely modified, while maintaining the basic principle of three contact points. As a result, you can get the same pipe bender, but from different materials. In a stationary version, it may look like this:
Vertical three-point pipe bender see the video
The pinnacle of convenience and manufacturability, without a doubt, will be an electric hydraulic jack. This is the “aerobatics” of a home craftsman, but a quite possible option with advanced skills and access to the turning shop. These models are on sale.
In order to assemble a pipe bender with your own hands, it is not so much the drawings that are important as the availability of tools and improvised material – metal, wheels, bearings, etc. Using our advice and your own skill, this is quite within the power of a home craftsman.
Does anyone have experience with making a DIY profile pipe bender? I would love to see some drawings or get some tips on how to manufacture one. Any help or guidance would be greatly appreciated!
Can someone please provide detailed drawings and manufacturing tips for a DIY profile pipe bender? I’m interested in making one myself and would appreciate any guidance or resources you could share. Thank you!
Sure! Building a DIY profile pipe bender can be a challenging but rewarding project. To start, you will need detailed drawings and plans for the bender. You can find these online or in DIY welding forums.
In terms of manufacturing tips, it’s important to use high-quality materials such as steel for the frame and components. Make sure to measure and cut all pieces accurately to ensure proper alignment and function.
Additionally, consider incorporating features like adjustable guides and clamps for easy operation. Take your time during the assembly process to ensure everything fits together properly.
Remember to prioritize safety throughout the project and always wear appropriate protective gear when using the bender. Good luck with your build!