The content of the article
- How to make a sound amplifier
- For laptop
- DIY headphone
- Amplifier circuit for subwoofer
- Mini speaker amplifier
- DIY Tube Sound Amplifier
- Transistor Sound Amplifier
Connecting speakers to a laptop, TV, or other music source sometimes requires amplification using a separate device. The idea of assembling an amplifier with your own hands is good if you are prone to working with printed circuit boards at home and have some technical skills.
How to make a sound amplifier
The beginning of the assembly of an amplifying device for speakers of one type or another consists of a search for tools and accessories. An amplifier circuit on a printed circuit board is assembled using a soldering iron on a heat-resistant support. Special soldering stations are recommended. If the assembly is done with your own hands for the purpose of testing the circuit or for use within a short period of time, the option “on wires” is suitable, but you will need more space to place components. The printed circuit board guarantees compactness of the device and convenience in future use..
A cheap and widespread amplifier for headphones or small speakers is created on the basis of a microcircuit – a miniature control unit with a pre-wired set of commands for controlling an electrical signal. It remains to add only a few resistors and capacitors to the circuit with the microcircuit. The total cost of an amateur-class amplifier is ultimately significantly lower than the price of finished professional equipment from the nearest store, but the functionality is limited by changing the output volume of the audio signal.

Remember the features of compact single-channel amplifiers, assembled by yourself on the basis of chips of the TDA series and their analogues. The microcircuit generates a large amount of heat during operation, so you should eliminate or minimize its contact with other parts of the device. A heat sink grill is recommended for use. Depending on the model of the microcircuit and the power of the amplifier, the size of the required radiator increases. If the amplifier is assembled in a housing, you should pre-plan the place for the heat sink.
Another feature of the DIY sound amplifier assembly is its low voltage consumption. This allows you to use a simple amplifier in cars (powered by a car battery), on the road or at home (powered by a special unit or batteries). Some simplified sound amplifiers require only 3 volts of voltage. Power consumption depends on the degree of amplification of the audio signal required. The sound amplifier from the player for standard headphones consumes about 3 watts.
It is recommended that a beginner amateur use a computer program to create and view circuit diagrams. Files for such programs can have the extension * .lay – they are created and edited in the popular virtual tool Sprint Layout. Creating a do-it-yourself scheme from scratch makes sense if you have already gained experience and want to experiment with the knowledge you have gained. Otherwise, look and download ready-made files that can be used to quickly assemble a replacement for a low-frequency amplifier for a car radio or a digital combo amplifier for a guitar.
For laptop
Do-it-yourself sound amplifier is about to be assembled for a laptop in one of two cases: the built-in speakers are out of order or their volume and sound quality are not enough for your needs. You will need a simple amplifier, designed for external speakers up to 2 watts, and winding resistance up to 4 ohms. To assemble it with your own hands, in addition to standard amateur radio tools (pliers, soldering station), you will need a printed circuit board, a TDA 7231 chip, and a 9-volt power supply. Choose the case in which the components of the amplifier are located.
Add the following items to the list of purchased components:
- non-polar capacitor 0.1 uF – 2 pcs.;
- 100 μF polar capacitor – 1 pc.;
- polar capacitor 220 uF – 1 pc.;
- 470 uF polar capacitor – 1 pc.;
- constant resistor 10 KOhm – 1 pc.;
- 4.7 ohm constant resistor – 1 pc.;
- on-off switch – 1 pc.;
- loudspeaker socket – 1 pc..
Determine the assembly order yourself, depending on which electrical circuit of the * .lay format you downloaded. Choose a radiator so large that its thermal conductivity allows you to keep the operating temperature of the chip below 50 degrees Celsius. If the device is constantly used with a laptop outdoors, it will need a makeshift case with slots or openings for air circulation. You can assemble such a case with your own hands from a plastic container or the remains of old radio equipment, fixing the board with long screws.
DIY headphone
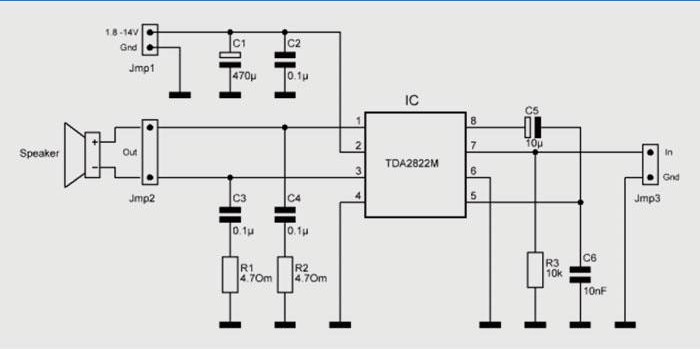
The simplest stereo amplifier for portable headphones should have little power, but the most important parameter will be power consumption. In an ideal example, the design is powered by finger batteries, in extreme cases, from a simple 3 Volt adapter. You will need a high-quality TDA 2822 microcircuit or its analogue (for example, KA 2209), a do-it-yourself electronic circuit for assembling an amplifier on a TDA 2822. Additionally, take the accessories:
- 100 uF capacitors (4 pcs.);
- up to 30 cm of copper wire;
- headphone jack.
A heat sink element is needed if you want to make the amplifier compact and with a closed housing. The amplifier can be assembled on a finished or home-made printed circuit board or in a wall mounted installation. The pulse transformer in the power source can cause interference, so do not use it in this version of the amplifier. The ready-made amplifier will provide a pleasant and powerful sound from the player (recording or radio signal), tablet or phone.
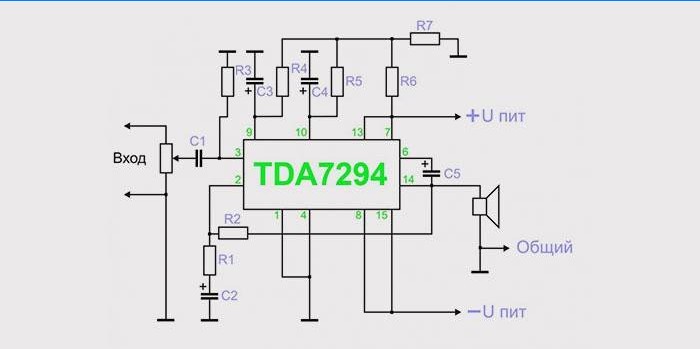
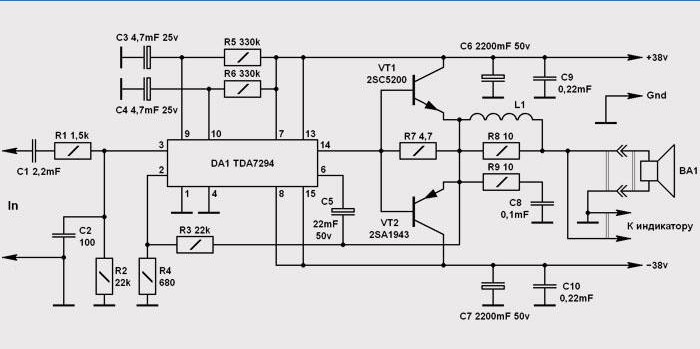
Amplifier circuit for subwoofer
The low-frequency amplifier is assembled with your own hands on the TDA 7294 chip. It is used both to create powerful acoustics with bass in the apartment, and as an auto amplifier – in this case, however, you need to purchase a bipolar power source for 30-35 volts. The figures below describe the location of components, as well as the rating of resistors and capacitors. Such an amplifier for a subwoofer will provide an output power of up to 100 watts with eye-catching low frequencies.
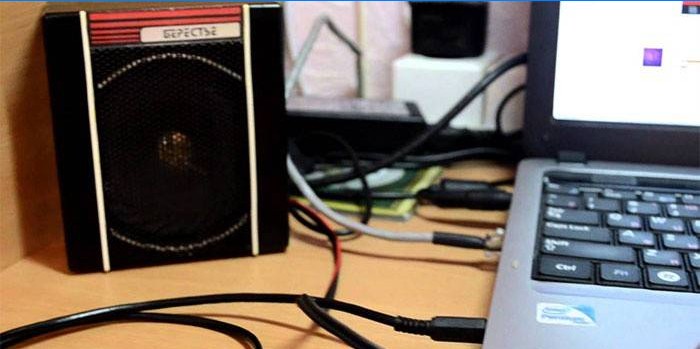
Mini speaker amplifier
As a sound amplification device for domestic or foreign home speakers, the design described above for laptops is suitable. The stationary placement of the device will allow you to choose any power adapter available. You can ensure the miniaturization and acceptable appearance of an inexpensive amplifier, observing several rules:
- Ready quality PCB.
- Durable plastic or metal case (order from the master).
- Component placement planned in advance.
- The amplifier is soldered neatly, without extra drops of solder.
- The heatsink only applies to the microcircuit.
- Ready-made sockets for signal output and power input are used.
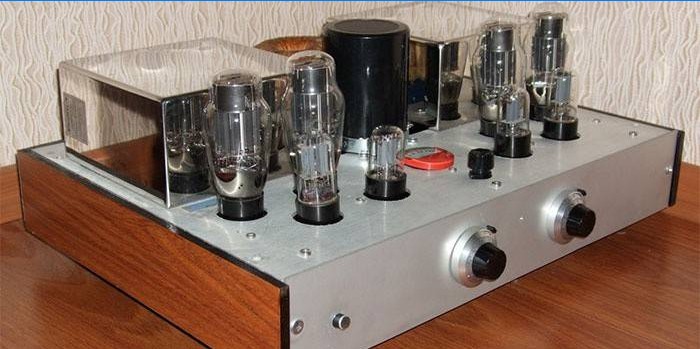
DIY Tube Sound Amplifier
Tube sound amplifiers are expensive devices, provided that you purchase all components at your own expense. Old hams sometimes hold collections of lamps and other parts. Assembling a tube amplifier at home with your own hands is relatively easy if you are willing to spend several days searching for detailed circuits on the Internet. The sound amplifier circuit in each case is unique and depends on the sound source (old tape recorder, modern digital technology), power source, estimated dimensions and other parameters.
Transistor Sound Amplifier
Assembling a sound preamp with your own hands without the use of complex microcircuits is possible on transistors. The germanium transistor amplifier is easily integrated into modern audio systems; it does not require additional tuning. The disadvantage of transistor circuits is the larger assembly size. The dependence on the “purity” of the background is also unpleasant – you will need a shielded cable, or an additional circuit for suppressing noise and ripples from the network.
Can you provide some step-by-step instructions on how to build a DIY sound amplifier?